Now that the IRLP Node has been running smoothly for a few months, I’ve decided to try the Nano Node SE with an external radio.
Its internal radio is intended for local use, hence the 0.2 watt output. The Nano-Node SE has an external radio port and it’s time to have some fun with it.
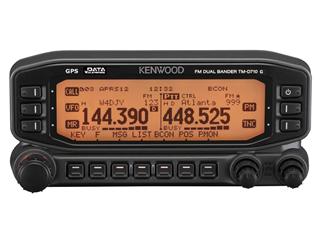
Kenwood TM-D710GA
The radio currently under consideration is the Kenwood TM-D710GA. The Kenwood includes APRS and GPS and can be easily connected to the node using the Kenwood data cables.
From the web:
The advanced Kenwood TM-D710GA adds an integrated GPS built right into the head. You will have a full 50/10/5 watts on both VHF and UHF. Key features include: internal clock for APRS® (Automatic Packet/position Reporting System) time and date stamp, APRS sort function, APRS filter function, APRS QSY function, APRS decay algorithm, APRS, proportional pathing, APRS voice alert, EchoLink ready, NOAA weather, 1000 memories and a sound card interface is built in. Versatile message with 100 messages (up to 67 characters each) is supported. There is also a NMEA 0183 GPS I/O port. And it can be employed as part of Kenwood’s Skycommand System II+ when used with the TS-2000 series. The screen may be set for orange or green. There is a clock/date function.
Kenwood PG-5A / PG-5G Data cables
DB9 with Terminal Block!
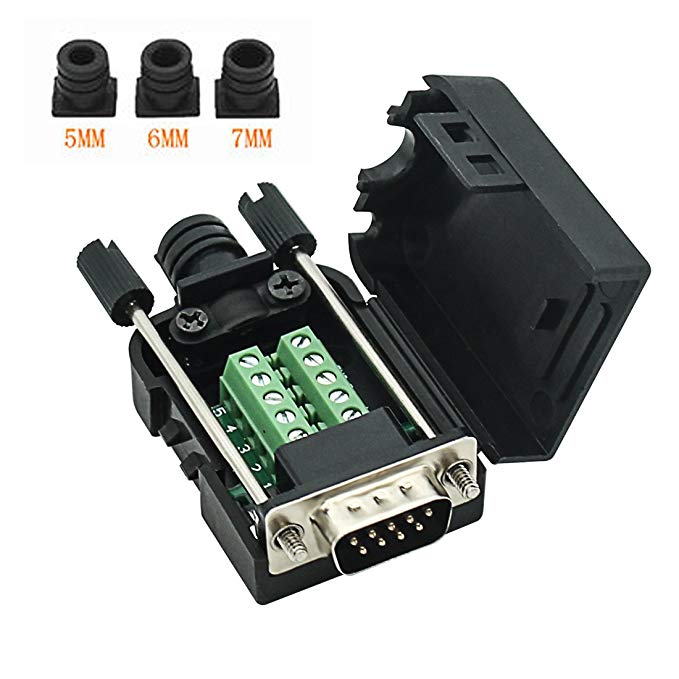
I could have purchased a pre-assembled data cable for $48. Instead I purchased the PG-5A cable and will attach the nifty DB9 connector shown above and save a few bucks. If I change radios the connector will come in handy again.
9/28/19 UPDATE:
I ordered the Kenwood TM-D710GA today. I didn’t see anything else that really came close for digital modes. It fits my needs perfectly for this upgrade. Besides, I already own a Kenwood TH-D74 handheld, so these should work great together.
The screw terminal DB9 has arrived, and the data cables are on order with the radio.
Comet GP-3
Dual Band 2M/440MHz base antenna
Small profile, good gain, excellent construction.
Gain:
2M: 4.5dBi
440MHz: 7.2dBi
VSWR: 1.5:1 or less
Max Power: 200 watts SSB/100W FM
Length: 5′ 11″
Weight: 2 lbs. 12 oz.
Mounting Mast Dia: 1.25 – 2.50″
Connector: SO-239
Construction: Heavy-duty fiberglass
I will be adding a 5ft section to the existing 5ft chimney mast and mounting the Comet GP-3 at the top. Just under the GP-3, I’ll be mounting the packet radio antenna, and positioning it for best signal path to AA6HF. This should be an improvement for the packet radio operation here, as the current antenna height is right at the tree level. Setting the antenna at 5ft above the tree line has to be an improvement. The GP-3 will be connected using CNT400 coax
I’ll be looking into connecting the radio as an APRS iGate.
One of the main reasons for installing this upgrade is so I can get IRLP whenever I want it without having to depend on some other system that I have no control over.
Recently I discovered I could no longer copy the Alaska Morning Net on my scanner radio at work. I can only guess that there was a node nearby, close enough, that I could hear it transmitting the AMN on 449.16 and now that node has ceased operation.
With my own IRLP node, I’ll be able to participate in the net, where before, I could only listen. Should be fun to check in!
update: 10/4/19
I picked up the Kenwood TM-D710GA Dualband transceiver today. Over the next day or so, I’ll be programming the radio and putting together the ‘external radio’ cable used to connect the Kenwood to the Nano-Node SE.
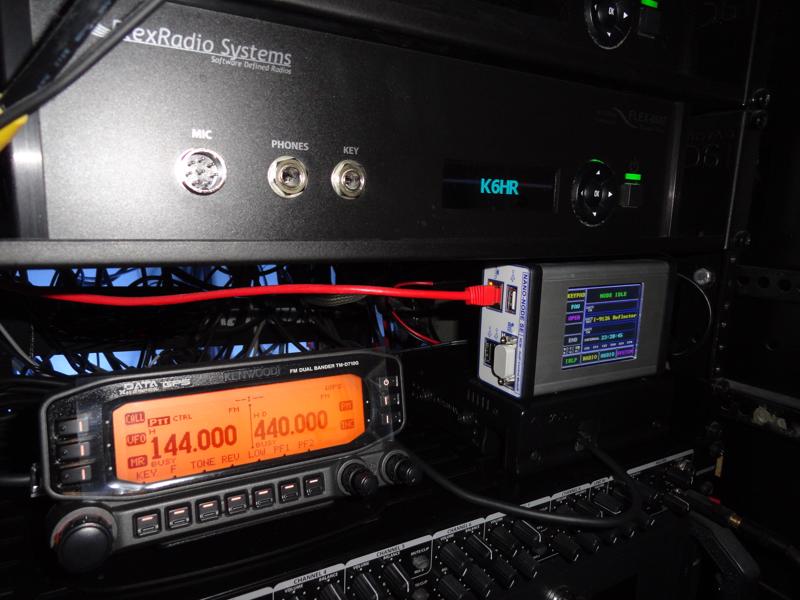
Data Cable from TM-D710GA to Nano-Node SE
update: 10/7/19
I assembled the ‘external radio’ cable today. It was super easy using the nifty DB9 connector (with screw terminals).
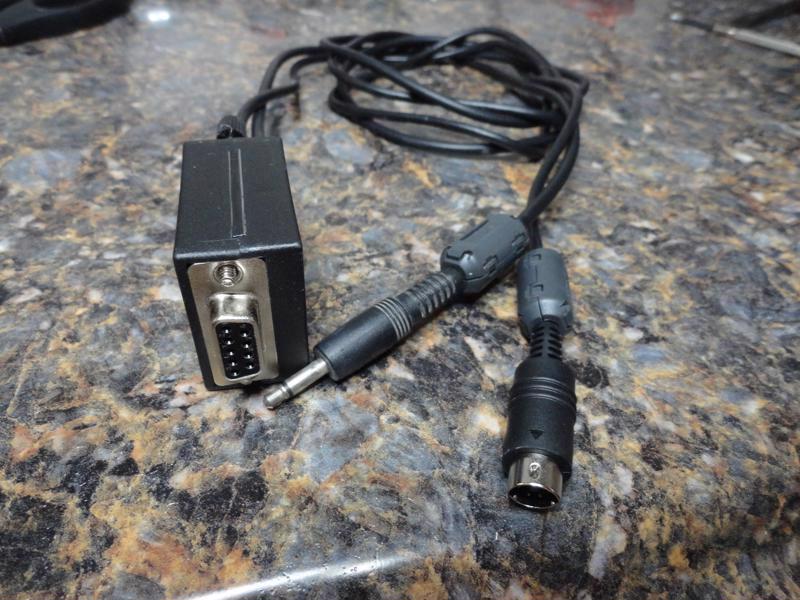
All you need are a female DB9, a Kenwood PG-5A Data Cable, and a 3.5mm T/S audio plug, and in no time at all, you’ll have the radio and node up and running!
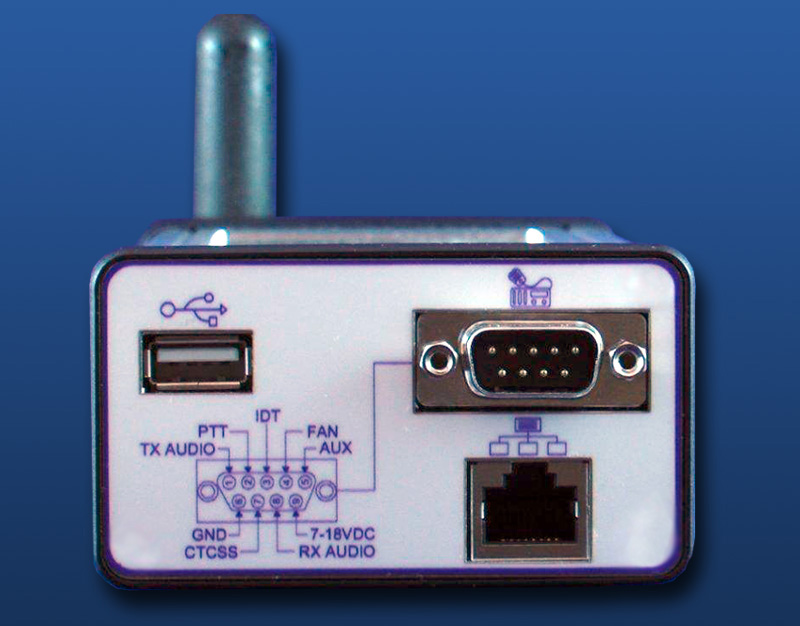
PG-5A to NANO SE
PIN 1 BROWN >>>>>>>>>>>>>>>>>>>>>>>>PIN 1
PIN 2 RED >>>>>>>>>>>>>>>>>>>>>>>>>>PIN 6
PIN 3 WHITE >>>>>>>>>>>>>>>>>>>>>>>>PIN 2
PIN 6 BLUE >>>>>>>>>>>>>>>>>>>>>>>>>PIN 7
3.5MM AUDIO to NANO SE
TIP >>>>>>>>>>>>>>>>>>>>>>>>>>>>>>>PIN 8
SLEEVE >>>>>>>>>>>>>>>>>>>>>>>>>>>>PIN 6
TM-D710GA Setting for COS Signal
After connecting the radio and Nano SE, you have to go into the Radio menu and change the default setting for SQC SOURCE in order for the node COS to work correctly. When you switch to ‘External Radio’ on the node, a button appears that reads “COS Input: ACTIVE HI” You now have to set the radio to generate the correct signal to enable the node for TX. The node is expecting ACTIVE HI from the radio by default. I did not change this setting on the node.
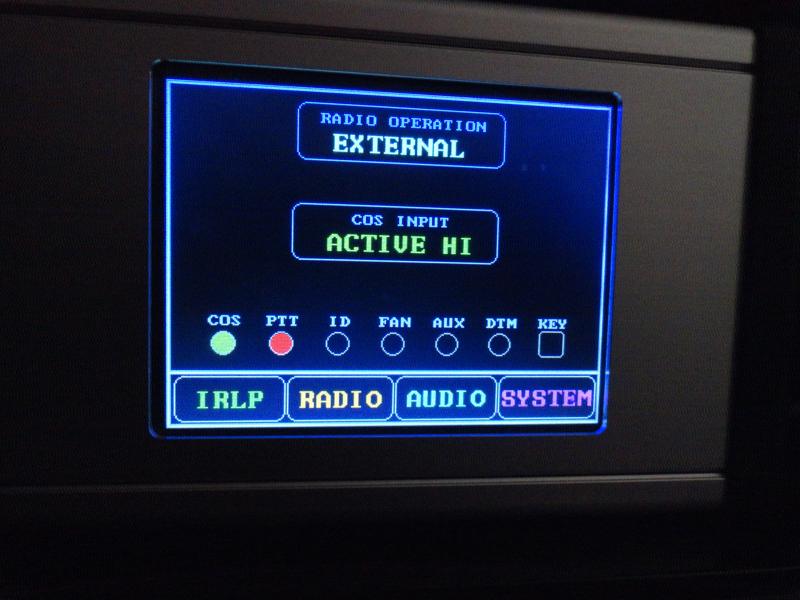
With the node COS activated by the “SQL” signal, and the squelch controlled by a CTCSS tone. The radio squelch will only open for a valid (desired) signal, thus, no unwanted signals will be sent to the internet.
Access the radio menu #921 “SQC SOURCE” and change this setting to “SQL” and you are ready to go. It’s worth mentioning that the TM-D710GA does not pass the CTCSS tone through the rear data connector. The IRLP gurus would prefer that the radios used for nodes be capable of passing the CTCSS. Lucky for me, it’s not a deal breaker. COS derived from a CTCSS coded squelch condition is deemed acceptable. (just not ideal)
Take a minute to adjust the audio mixer on the Nano-Node. I adjusted mine using the little touchscreen. The audio sounds GREAT, and I received a rating of “excellent” from one of the WinSystem controllers.
My settings are “XMIT 32” and “RECV 81”. A quick check through the IRLP test reflector [9990] verified the settings sound good.
On The Air Test 10/10/19
Shortly after putting the node on the air using the default frequency of 446.875 I was notified by WinSystem Controllers that my node was sending intermod noise to the IRLP system. I checked the IRLP Status page looking for nearby stations, and sure enough, there was another node nearby also using the default settings.
The IRLP Status Page allows you to enter a radius showing other nodes within a selectable distance. So, I looked at 50 miles, and sorted through the UHF frequencies in use. I also looked through the repeater directories and ultimately came up with 446.8 Mhz for my operating frequency with a CTCSS tone of 100hz . I’ve had the node connected all day today for the first time. I’m watching 446.8 on the panadapter of my Flex VU5K. The frequency has been quiet, and so far, has had nothing close enough to create a problem. I’ll keep an eye on it, and hopefully I can settle on this frequency.
UPDATE: 10/16/19
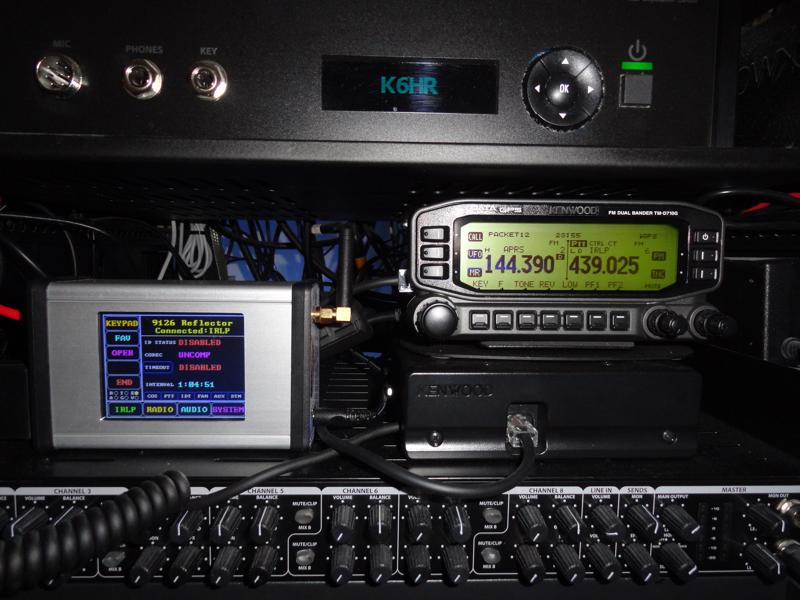
Node moved to 439.025 to avoid a conflict.
I Love it When a Plan Comes Together!
The NANO-NODE SE and Kenwood TM-D710GA are fully integrated and working flawlessly together. Now on to the final stage of this upgrade.
Roof Work
I have the GP-3 in the closet for the time being. The roof work is something I don’t look forward to. However, there are a few things on the roof that require attention:
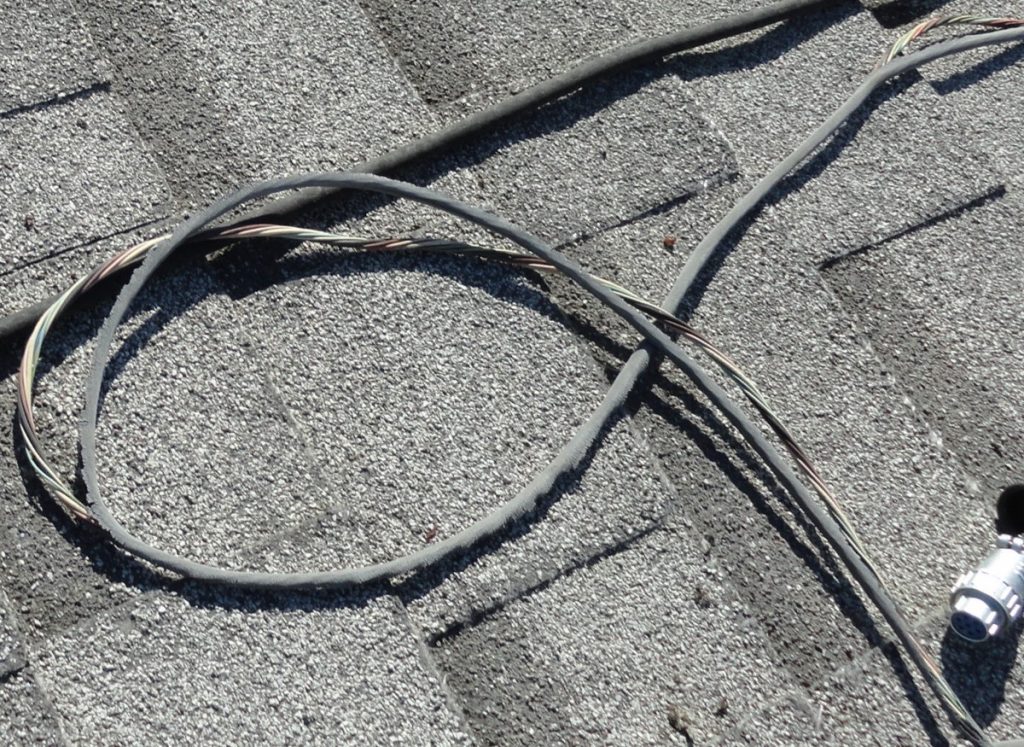
- Replace the 15 year old rotor cable that has been destroyed by the sun. The HF antenna hasn’t turned in over a year!
- Satellite antennas need to be realigned and tightened in place.
- Mount the GP-3 and my packet radio antenna on the 10 ft. chimney mast.
I’m planning to complete the roof work on the first day of my upcoming vacation near the end of this month. The plan is to have the HF antenna turning again in time for the CQ WW SSB Contest.
update: 10/20/19
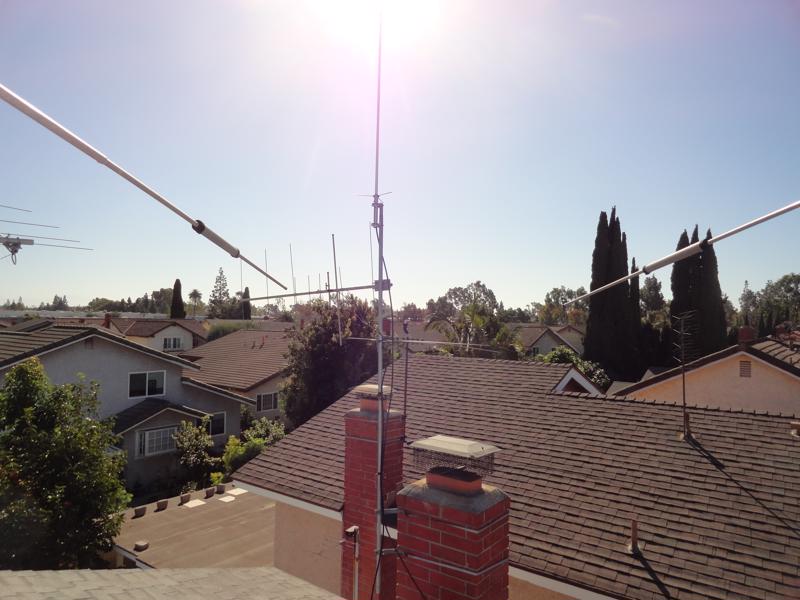
Roof work complete!
The GP3 is several feet above the tree line, and the packet antenna gained 5 ft. putting it just above the tree line. I may try swapping these antennas at some point to see if there are any advantages.
I replaced the rotor cable and the rotator is working again! The sun literally burned the insulation off the rotor cable right down to the copper conductors! I turned the rotor off after noticing the pointer on the controller was not moving with the antenna, that was back in 2017!
When I saw the condition of this cable I disconnected it. It wasn’t hard to imagine that the shorted rotor cable would likely blow-up the controller if it remained connected and energized.
I’m happy to have the rotator back in service. I have it connected to DX Lab, so when I click on a spot, the antenna automatically moves to the correct bearing for the DX station. It’s very handy to turn on this feature during DX contests!
Last but not least, I re-positioned the satellite antennas. A very strong wind event had blown them about 17 degrees off azimuth. This didn’t affect operations, as I entered the offset into the rotor control software. It is nice to have them squared away.
ANTENNA UPDATE: 10/22/19
The antenna is not nearly high enough to get the coverage I was hoping for. However, the limitations are what they are, and this is the best height (HAAT) I’ll be able to achieve at this QTH. The coverage is great all around town and the surrounding neighborhoods and that’s where it will get the most use anyhow.
Project Complete!
This upgrade is a wrap! Now I can move on to testing the range of my IRLP node, and fine-tuning the APRS software. Great fun to say the least.
This is a nice upgrade to have in place as we wrap up 2019! Time to start looking into 2020 upgrades!