These web pages describe my station’s construction and operation. They also include some personal reviews, recommendations, and links to relevant information. I try to offer some insight into the research and planning stages of the station build.
Check back for updates to what’s going on here in the shack. I’m always building or improving something related to Amateur Radio, and I’ll post my findings here, in the event others may be interested.
I jumped right into the FT8 fray. I setup a Flex 6500 specifically for use in the digital modes. FT8 in particular. Like everyone else, I heard a lot about the mode and decided to give it try. It wasn’t long before I realized that logging my FT8 contacts manually was not only cumbersome, it created opportunities for data entry errors. I use DXLab’s DXKeeper for logging, and a quick google search revealed that JTAlert provided connectivity with several popular logging programs, including DXKeeper. The main feature of interest to me is JTAlert’s ability to link WSJT-X to the DXLab Suite of programs. Using JTAlert as a bridge, I could connect my FT8 operations directly to the DXKeeper logbook!
Setting up the Flex to work with WSJT-X was relatively easy. I was making contacts and having a blast. The Flex 6500 is using a multiband antenna (CHA-250B vertical) so I can change bands with a click to be wherever the action is. I also have a second instance of WSJT-X running in order to monitor a second band. So the logging can get fairly complex. After the first two data entry errors, I knew I had to find a solution.
JTAlert Setup and Configuration
I downloaded JTAlert and followed the installation instructions found here. I installed on a Windows 10 Home Edition PC and used the version designed to fix the ‘missing menus’.
JTAlert has a lot of features that I am not currently taking full advantage of. As I get more adept at working FT8 I’m sure I’ll find a use for some of these extra features. There are filters to help you find contacts you need so that may be a useful feature down the road, as I currently need everything!
It turns out that despite all the fun as I was having, I was doing it wrong. I would soon find out that my FT8 operating skills left a lot to be desired. After reading the article Hinson’s Tips for FT8 and in particular the section that explained the “Hold TX Freq” feature, I quickly realized what I was doing wrong.
It turned out that under certain operating conditions I had been unintentionally QRMing stations that I had just made contacts with.
If “Hold TX Freq” is not selected the TX frequency changes to the calling frequency for every CQ call you reply to.. For example, let’s say I replied to a station that was calling CQ, and after the contact was complete, I changed over to calling CQ myself. I was then transmitting in the previous stations ‘slot’ and QRMing them. Bad practice! Needless to say, I’m very happy to have read Hinson’s tips! I think the “Hold TX Freq” should be the default setting!
Software “Automation”
One could say that JTAlert has claimed a legitimate place in the station automation scheme.
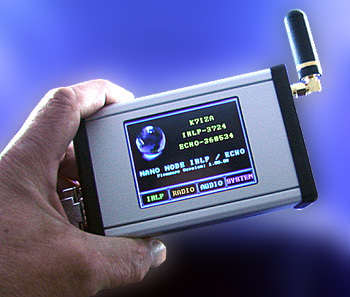
Introducing the first complete ECHO/IRLP Node Computer in an ultra
small package measuring just 5”(127mm)W x 3”(76mm)L x 1.7”(43mm)H. The
unit comes complete with the ECHO/IRLP/Debian Operating system
pre-installed with node number assigned (new or existing). “Just Plug
And Play” . No Knowledge Of Linux Required .
Nano-Node Features
Complete IRLP / EchoLink Package “Just Plug And Play”. Absolutely No Knowledge Of Linux Required.
The Entire Unit Including The 0.2 Watt Radio Fits In The Palm Of Your Hand. Just 5″ x 3″ x 1.7″.
Front Panel Color TFT Touch Screen Display Allows Setting Of Node Options Plus Monitor And Control The Node Locally.
Any Web Browser Can Be Used To Set Node Options Plus Monitor And Control The Node From Anywhere On The Internet.
It Can Be Used With The Built In Programmable 430 to 450Mhz 0.2 Watt Simplex FM Transceiver Or External Radio.
EchoLink System Software Is Installed And Ready For Use.
Operates From A 7-18VDC 300-400ma Power Source. Ideal For Mobile Or Portable Operation.
There are some interesting nets and far away places reachable through IRLP/EchoLink. I’ll use the same approach of listening first to see how things are done.
Research
I’m looking at all the available options and doing my due diligence. I reviewed the You Tube Videos for Nano-Node and picked up a lot of great information. I’m also looking at the hardware on irlp.net
Gonna need a radio for that open port!
At the same time, I’ll be researching a transceiver for the external radio port on the nano-node.
A Quick Note To Document The Ubuntu 18.04 LTS Upgrade
I decided to upgrade the Ubuntu Operating System today from 16.04 LTS to 18.04 LTS. The upgrade was successful! The only issue was WordPress. It needed a couple of tweaks to get it up and running again since the PHP version had changed. This article was also helpful. Using info obtained from both articles, I was able to fix the WordPress problem within a few minutes of understanding it.
For many years I ran outdated Linux O/S’s and did not upgrade very often. As a newbie, my thinking was, I didn’t want to break machines that were working. I eventually setup test machines and built them using modern hardware. My old linux machines ran on ancient hardware! Good times! The good old days of Caldera Open Linux, RedHat, and Fedora systems over the years. Now the linux OS is much more refined and mainstream.
Open the “Software & Updates” Setting in System Settings.
Select the 3rd Tab called “Updates”.
Set
the “Notify me of a new Ubuntu version” drop down menu to “For any new
version” if you are using 16.04 LTS; set it to “For long-term support
versions” if you are using 17.10.
Press Alt+F2 and type update-manager -c into the command box.
Update Manager should open up and tell you that Ubuntu 18.04 LTS is now available.
If not you can run /usr/lib/ubuntu-release-upgrader/check-new-release-gtk
Click Upgrade and follow the on-screen instructions.
To upgrade on a server system:
Install update-manager-core if it is not already installed.
Make sure the Prompt
line in /etc/update-manager/release-upgrades is set to ‘normal’ if you
want non-LTS upgrades, or ‘lts’ if you only want LTS upgrades.
Launch the upgrade tool with the command sudo do-release-upgrade
Follow the on-screen instructions.
Note that the server upgrade will use GNU screen and automatically re-attach in case of dropped connection problems.
There
are no offline upgrade options for Ubuntu Desktop and Ubuntu Server.
Please ensure you have network connectivity to one of the official
mirrors or to a locally accessible mirror and follow the instructions
above.
Let the record show Ubuntu 18.04 LTS was installed on 5/5/19 and the server OS has been completely upgraded!
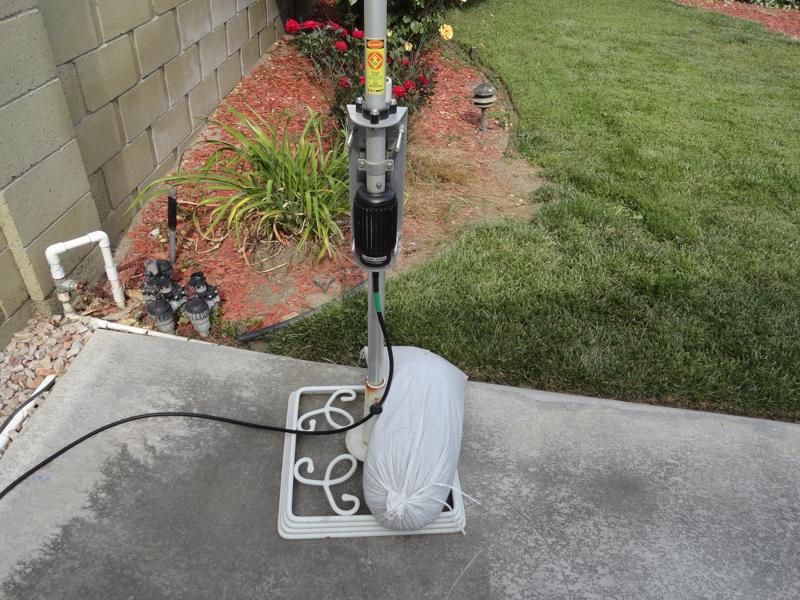
The Comet CHA-250BX vertical has been on the test stand long enough. It’s time to move it into a permanent location on the property.
Comet CHA-250B on the “test stand”
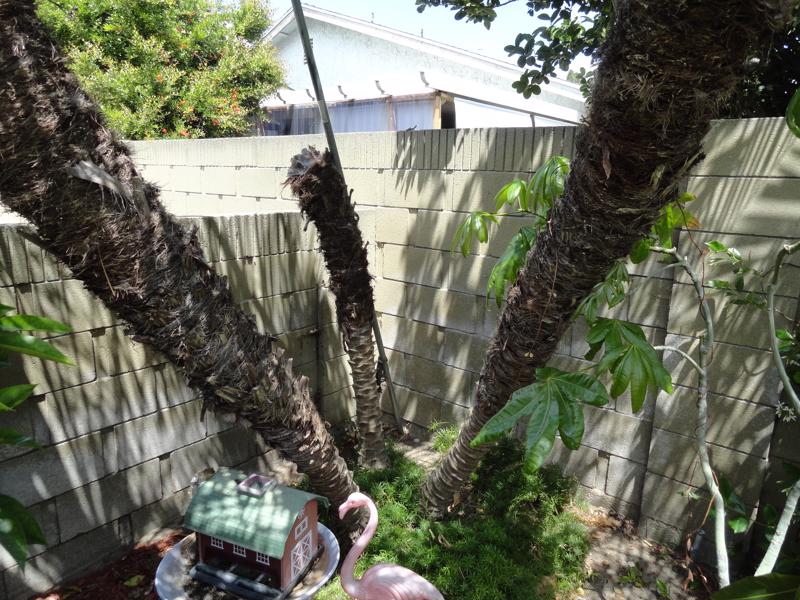
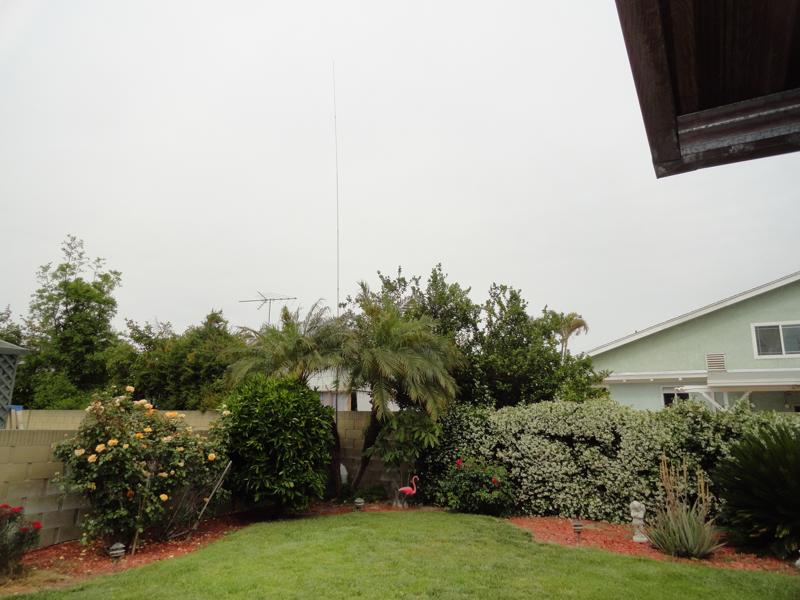
I plan to put the CHA-250BX on the top of one of the support masts that currently hold up one end of my “Height Compromised Dipole“. It’s in the corner behind a palm. I read a few eHam reviews that mentioned good results were achieved by mounting the CHA-250BX just 10 to 15ft above the ground. The antenna height affects the take-off angle, and apparently 10-15 feet is yielding some good results. I’m already working some DX barefoot via FT8, so I know the antenna performs OK. With all the testing, I now have a baseline to compare the performance against once it’s at the new height.
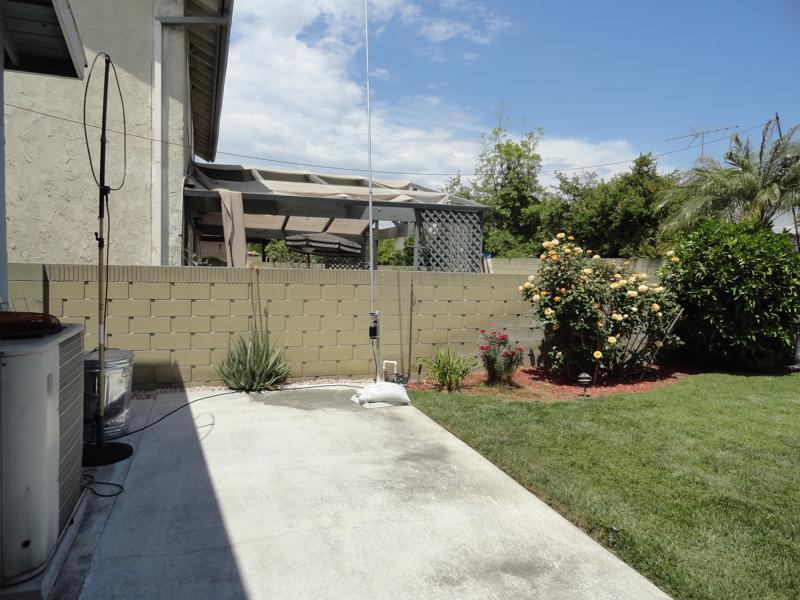
New Location For The CHA-250BX
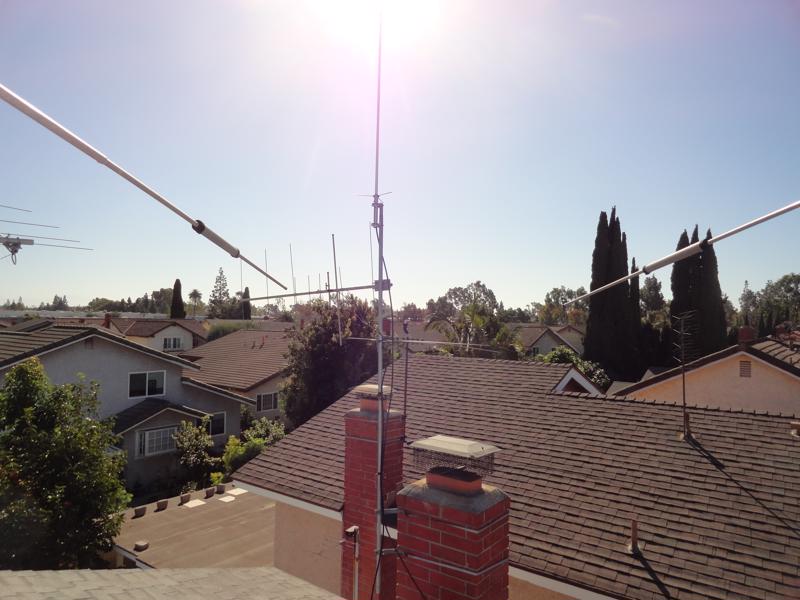
If you look closely at the image below you can see the mast in the corner of the yard. I had it strapped to a huge stake that I drove into the ground. It was held in place using hose clamps. It stood up straight for years until part of the palm died and knocked it loose. I’m going to extend the current 100ft Andrew CNT-400 with another 50ft of the same coax.
New Home For The CHA-250BX
Recycle The Base Parts
The test stand is an old umbrella stand. I plan to fit the weighted base squarely into the corner against the cinder block wall, and secure it using the big stake, and the 50 lb sandbag.
Comet CHA-250BX Umbrella Base
This steel mast is 15ft tall, a 5 ft section on top of a 10 ft section. When I re-deploy the mast I will switch the 5 ft section to the bottom, this way, when I have the antenna ready to go I can stand on a step ladder and insert the 10 ft section much easier. If 15 feet is judged to be too tall to stabilize, I will eliminate the 5 foot section.
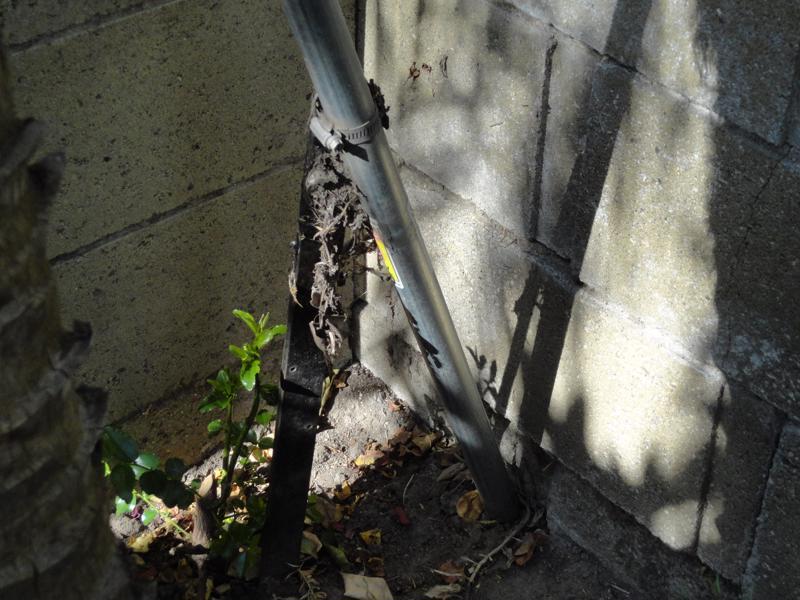
New Location For The CHA-250BX
Square In The Corner
The umbrella stand will fit perfectly into this corner.
I’ll re-use the stake to secure the stand
I have some mollies leftover from a recent flower trellis repair. I can use some of them as anchors for the steel straps if it looks like I’ll need them..
The Comet CHA-250BX will go into this corner
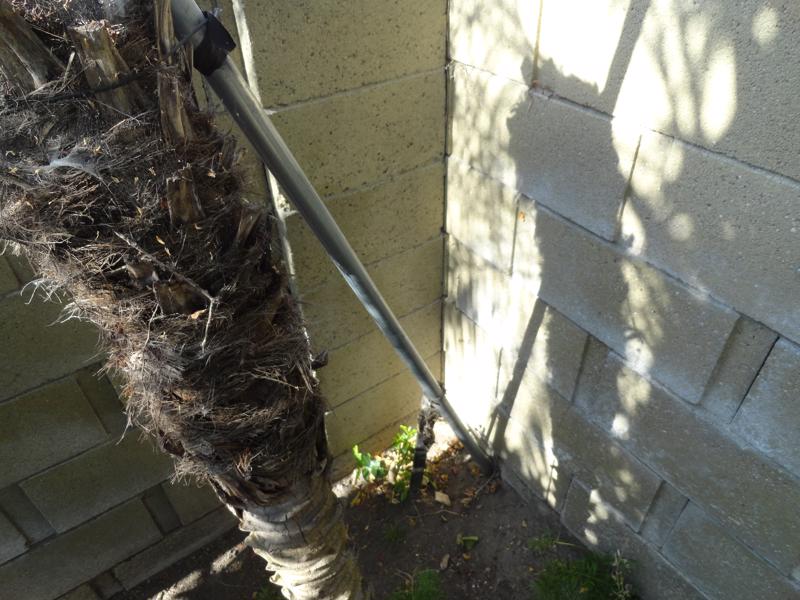
Comet CHA-250BX At Ideal Height
The 5 ft section will be reinforced using two sets of steel straps (at 1 and 5 feet above ground), and an additional guy line to reduce or eliminate any sway. I’ll add a pulley to the top for the dipole, and hang a weight from the end insulator to reduce stress on the mast when it’s windy. I’m also going to devise a wooden support beam that will go in between the mast and the 90 degree concrete corner. I’ll be able to tighten the steel straps to keep the mast firmly against the beam. I’ll square one end of the wooden beam for the corner, and make a cutout for the mast diameter on the other end. This should be a rock solid base. The antenna is 23.8 feet tall, and weighs 7 lbs. with a 67 mph wind rating.
I have a spare ground rod which I will install at the base.
Update: Sat 05/18/19
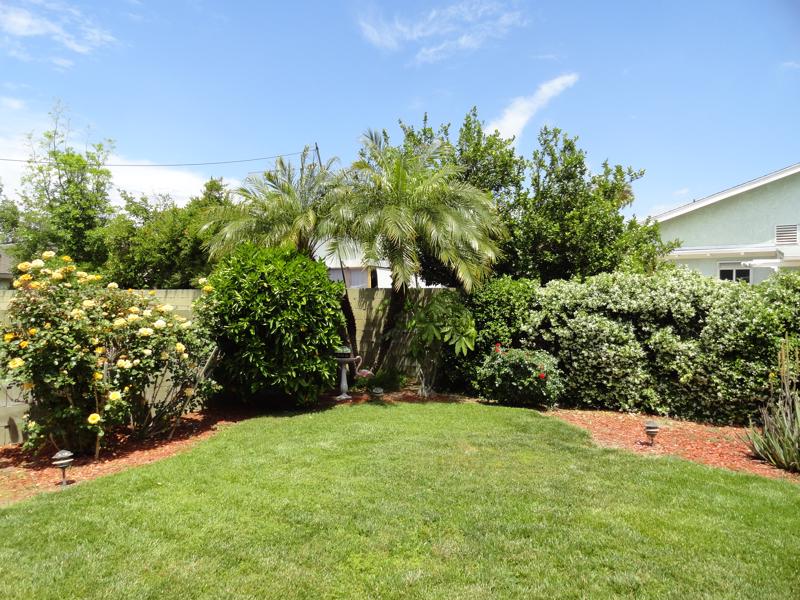
XYL: Where Did You Put That Antenna?
What Antenna?
Where’s The Antenna?
Tucked away nicely in the corner of the yard! Barely noticeable to the XYL.
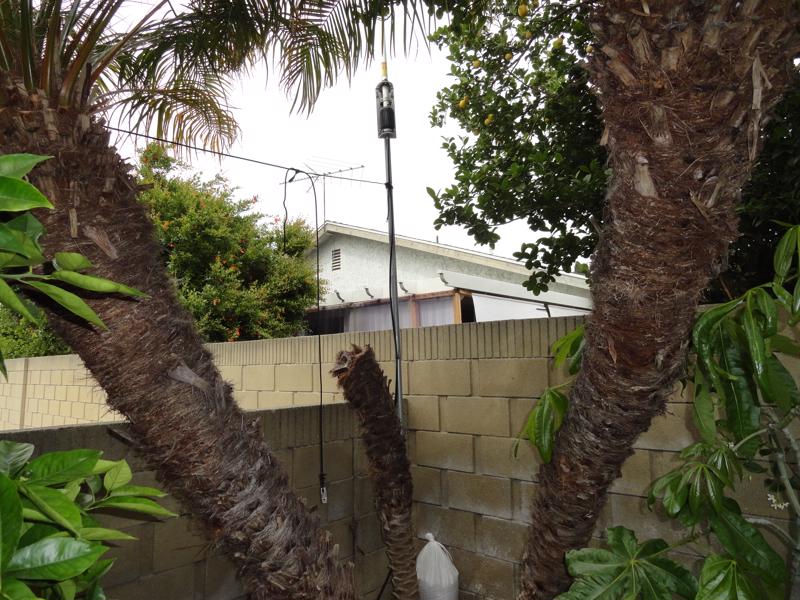
The feedpoint is now 3 meters above ground
There are several articles out there about antenna height versus take-off angle. There seemed to be some consensus that a height of 3 meters above ground offered some improvement in performance.
I decided the antenna would not be stable at the proposed height. Its proximity to neighbors property is also a factor. So instead of 15 feet, I mounted it at 10ft (3m)
OK. Let’s see what kind of results we get. The antenna had to move anyway, so hopefully we get some good results.
update: 05/20/19
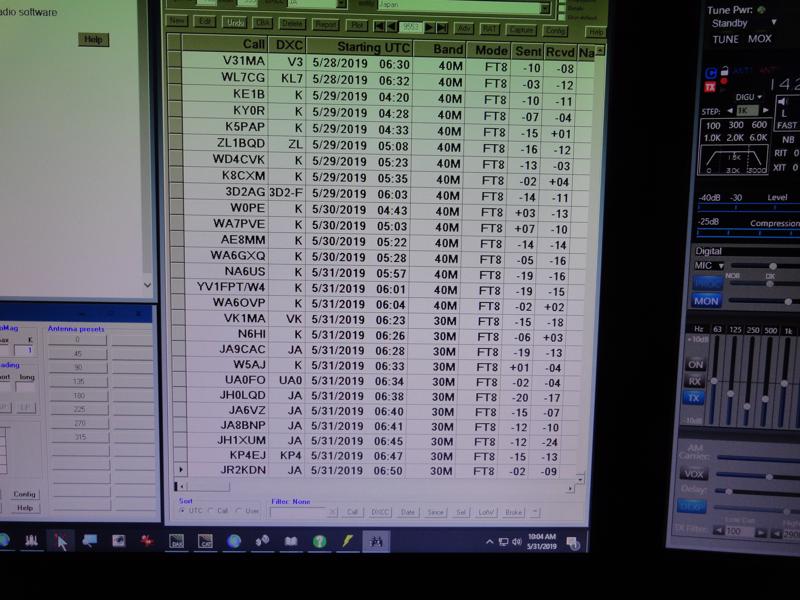
I leave two instances of WSJT-X FT8 running 24/7. Then, when I get home from work, I scroll back through the RX windows to see what was heard while I was away. I’ve been running it this way since I first put up the CHA-250 vertical back in March 2019.
INSTANT RESULTS
I’d left it on 40m since yesterday afternoon (just over 24 hours) and came home today to find EU callsigns in the FT8 console for the first time. Lots of DX calls, among them Italy, Croatia, Morocco, Mauritius, Ecuador, Japan, Indonesia, Philippines, New Zealand and on and on. Keep in mind this is just the past day on 40m! I never saw anything like this when the antenna was on the test stand.
If you have your CHA-250BX mounted on the ground give it a try on a 10ft mast! Let’s see how many of these newly heard DX callsigns can be worked!
the bonus: antenna separation
An added bonus! The increased antenna separation between the vertical and the RX Loop has eliminated the de-sense I was seeing on the 6700’s HF RX. As I work FT8 I am usually listening to 80m on the 6700/W6LVP Loop. The antenna separation is now sufficient that the FT8 transmissions no longer interfere with other HF RX in the shack. Perfect world.
it Turns out to be a major upgrade!
EA3KU 05/21/2019 05:15 FT8 100w 40M Sent -11 Rcvd -20
F6AOJ 05/25/19 04:28 FT8 100w 40M Sent -17 Rcvd -22
EA8TH 05/2519 06:23 FT8 100w 40M Sent -19 Rcvd -22
WSJT-X was installed on 03/09/19 and my DX contacts up to this point included JA’s and ZL’s and VK’s, but I hadn’t copied any EU callsigns before raising the antenna. Now I’m working into EU, so I am very pleased with this upgrade.
update 03/09/20 wsjt-x results
At this point, I’ve worked thousands of FT8 QSO’s and some great new DX. All you need is a 100 watt radio and this inexpensive antenna in order to work the world!
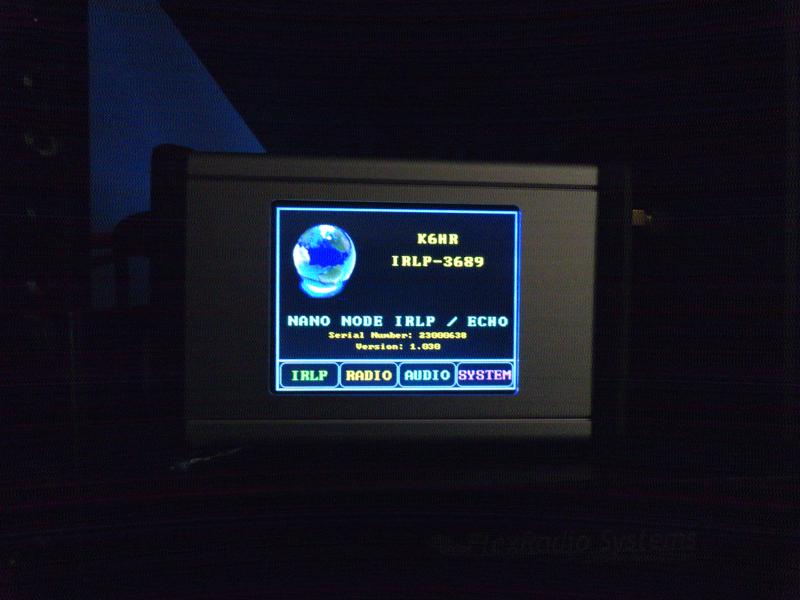
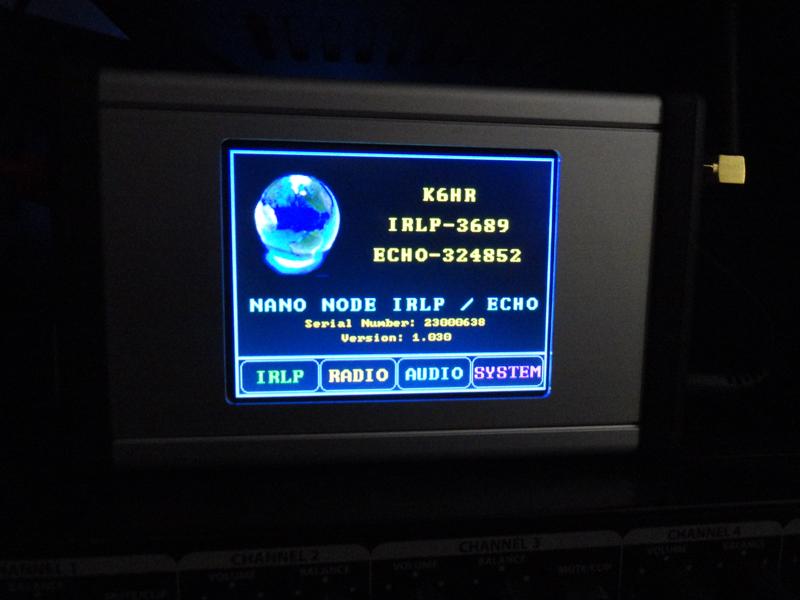
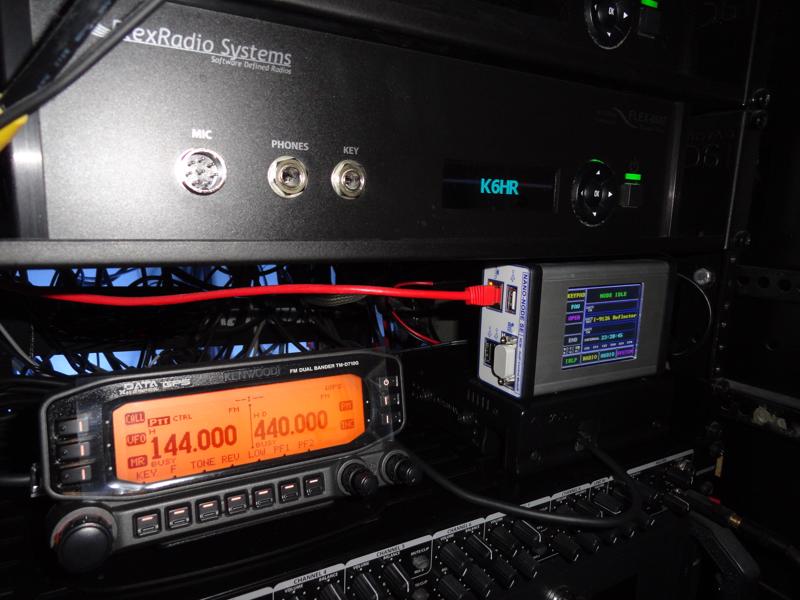
The NANO-SE arrived today. All I needed to do was add some port forwarding rules into my router, enter my LAT/LON, and the IRLP node 3689 was up and running, just a few minutes after taking it out of the box!
Well, That Was Easy…
I read through the manual ahead of time, and everything seemed fairly straightforward. The configuration menus make adding additional info into the node very easy.
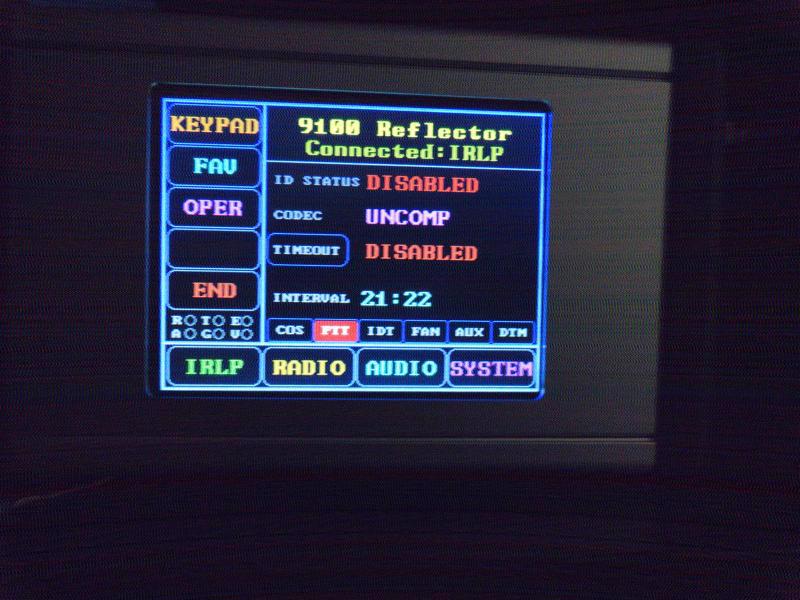
Connected to the WinSystem reflector 9100
The WinSystem was a sure bet to hear something during testing. So I made a quick call there to make sure everything was working. I got a quick response saying my audio was OK etc. (a good signal report) There’s a lot to listen to. I’m going through all the listings for net times etc. Sould be a lot of fun.
From The Micro-Node.com Website
Introducing the first complete ECHO/IRLP Node Computer in an ultra small package measuring just 5”(127mm)W x 3”(76mm)L x 1.7”(43mm)H. The unit comes complete with the ECHO/IRLP/Debian Operating system pre-installed with node number assigned (new or existing). “Just Plug And Play” . No Knowledge Of Linux Required .
It finally occurred to me that I had to download and install the EchoLink software on a PC in order to ‘validate’ as an EchoLink user. I will not be using a PC for EchoLink so it took me a minute to realize I had to run the PC software even if I was not going to be using it. The PC software is the registration tool. The NANO-SE manual makes no mention of how to register for EchoLink but comes pre-configured for IRLP. Today I had a minute to look into it further and realized the error of my ways! EchoLink Node 324852 is now online!
EchoLink Node 324852 is online!
Capability vs. Content
Now that I have EchoLink capability, I need to find some EchoLink content to listen to. At first glance it looks like a lot of ‘net’ type activity originates in the eastern US, and most of the net times are during work hours here. I’ll keep my eyes and ears open to see if I can find anything of interest on EchoLink.
EchoLink® software allows licensed Amateur
Radio stations to communicate with one another over the Internet, using
streaming-audio technology. The program allows worldwide connections
to be made between stations, or from computer to station, greatly enhancing
Amateur Radio’s communications capabilities. There are more than
200,000 validated users worldwide — in 151 of the world’s 193 nations — with about 6,000 online at any given time.
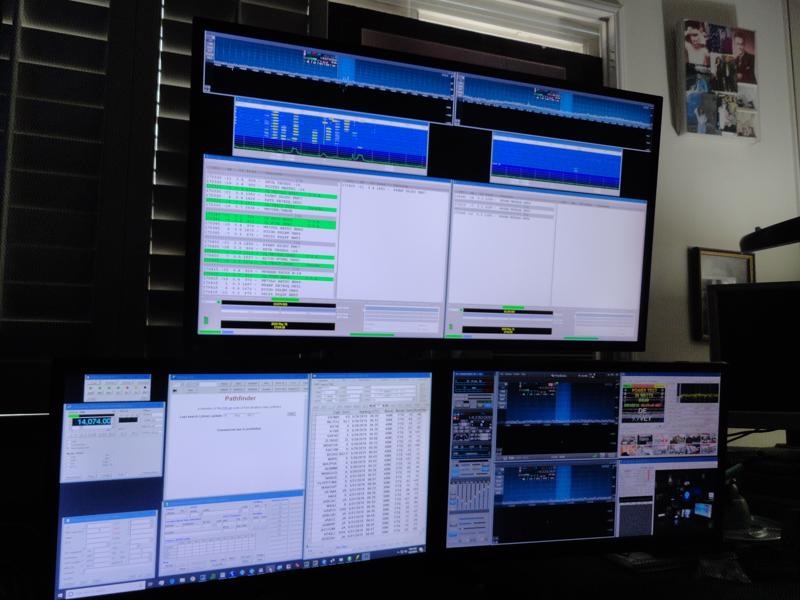
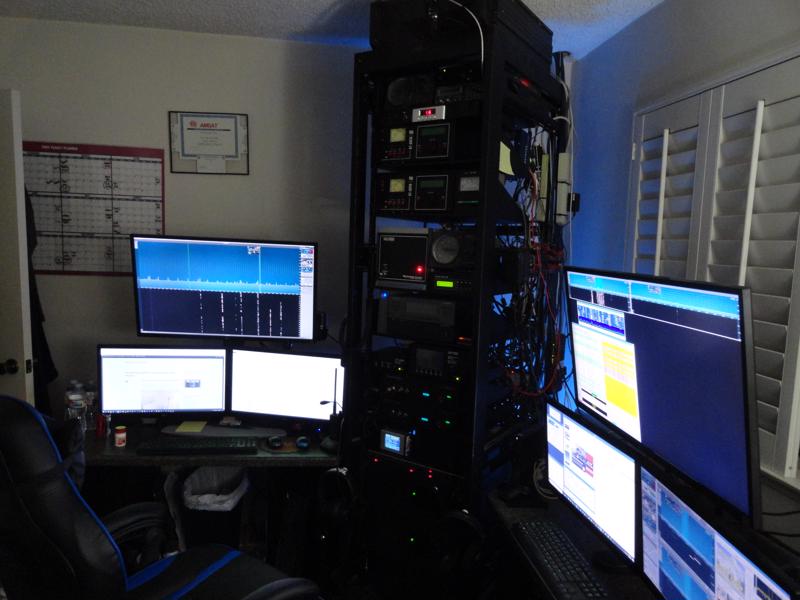
Time spent building the digital side of the station is proving to be time and effort well spent. The dedicated digital rig is paying off big time, as DX contacts are coming in on all bands. The DX results are better than anticipated!
Flex 6500 – Four Slice Receivers: Two running WSJT-X, one running MMSSTV, and the fourth running EasyPal. Add a Comet CHA-250BX Vertical @ 10ft and that’s it!
Barefoot Digital: 100 Watts into a Vertical
I wanted this to be a simple barefoot operation with a dedicated radio and antenna. I’m using a Dell 7050 micro PC and have the Flex displays “cranked down” in order to limit CPU usage to a range of 40-60%. Works great!
Evenings here have become a lot more interesting!
The past few evenings on 30 and 40 meters…See what I mean?
Every day this new digital mode attracts more and more people to the airwaves. It works with the briefest of openings and the software needed is free to download. It takes up about 60Hz only and works great with weak signals.
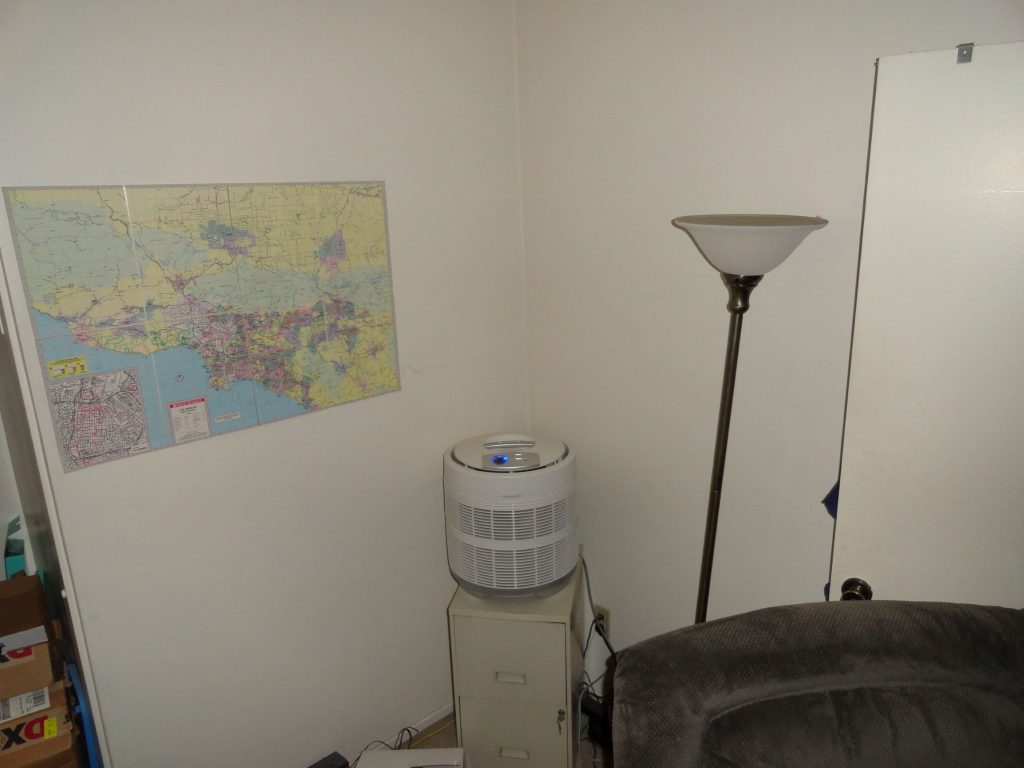
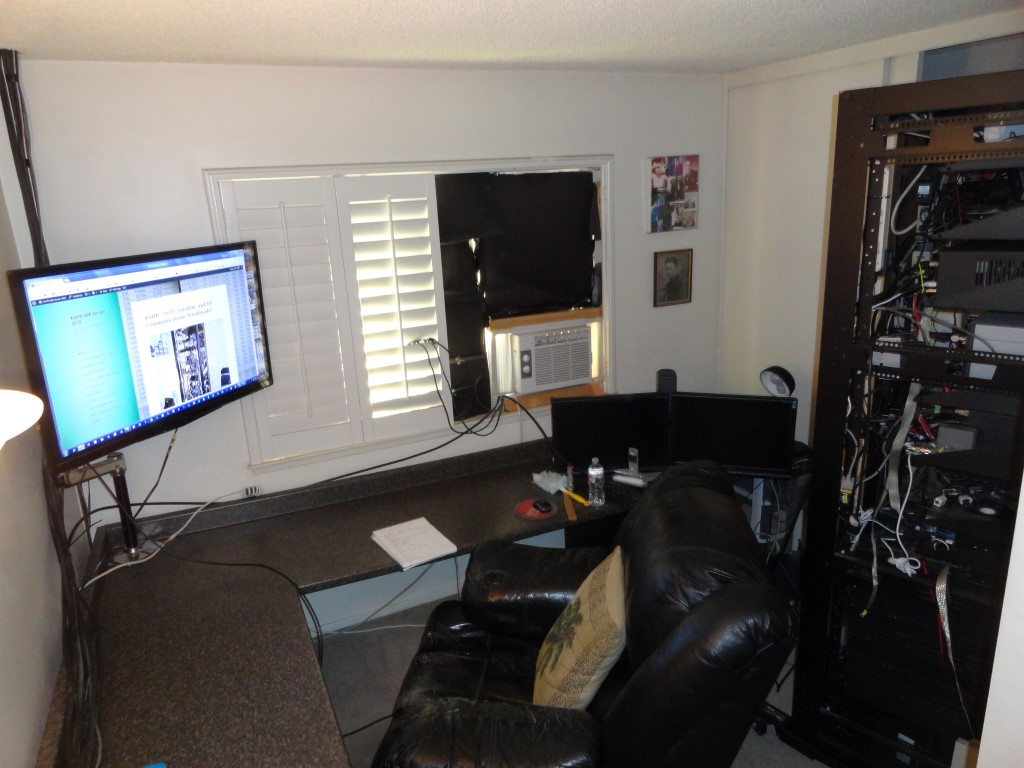
The operating positions in the shack are complete. Now it’s time to address the other half of the room which has remained empty up until this point. I need additional countertop space to do repair work etc.
This space: Soon to be home to a 5ft by 5ft by 2ft “L Shaped” laminate countertop workbench
Simple Countertop Setup
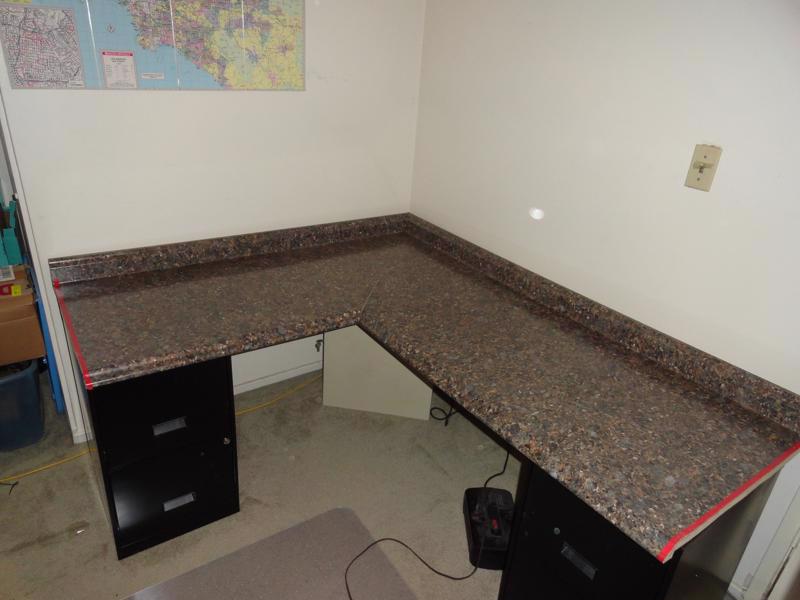
The new countertop will provide some much needed work space in the shack. I plan to use it mainly as a workbench. The layout will be a ‘mirror image’ of the original existing countertop. (shown below)
Another countertop in the opposite corner just like this one
The proposed ‘wrap around’ desktop will have openings at the closet door and at the entrance doors. I’ll be replacing the recliner with an executive chair. The new high back chair will be rolling on a glass mat, so it will be smooth and reduce dust from the carpet. By my measurements, there will be plenty of room to move around.
I’ll finally be able to set up my soldering station, PanaVise, magnifier, and other tools in an organized fashion.
All the parts have been ordered and this project should be complete by next weekend.
UPDATE: One must have a proper chair!
Merax Racing Chair: No more recliners in the radio room.
The chair has been delivered and assembled. One of the arms is a little wobbly and the bolt cannot be tightened any further, but I can live with it. The chair is pretty darn comfortable! Can you guess my favorite color?
Tomorrow, Friday 6/7 the remaining items will be delivered and I expect to have it all installed before dinner!
UPDATE: Countertop Install Complete
Trimmed to fit, miter joint nice and tight!Pleanty of room for test equipmentThe K6HR Operating Position
An opportunity arose for a great deal on an LP-100A. I went !BANG!
I came across an 8 month old TelePost LP-100A up for sale on QTH.com and quickly pulled the trigger. I’ve owned LP-100’s before and have always enjoyed having one. After the purchase of the LP-500, I got to thinking about a dedicated wattmeter for the Flex 6500.
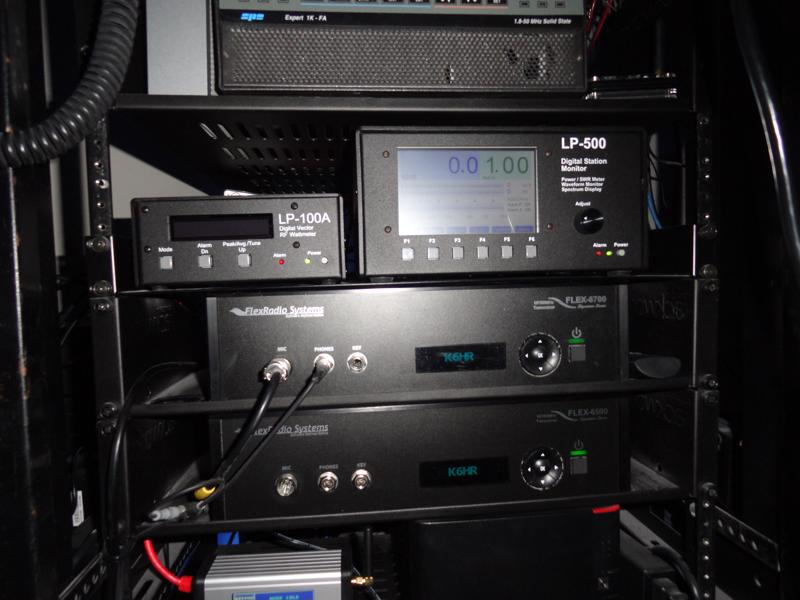
LP-100A: World Class Hardware
Everything you need for critical station monitoring, tuning and protection on one screen. No other meter has dual bargraphs, OR a graphic display with solid bargraphs, OR bargraph with 90 bars for fine tuning of Power and SWR, OR an SWR alarm with snooze mode, OR a “sticky” bar for graphic peak hold indication… let alone having them all on one screen! This is by far the best display for tuning a manual tuner, without having to change display mode for normal operation. It is also the only meter with 11 bands of frequency indexed NIST traceable calibration points using a built-in frequency counter.
Plus, the TelePost LP-100A has additional modes no other wattmeter has when you desire them... vector impedance, dBm/RL, calibrated field strength and compression ratio.
Metering for the Flex Digital Station
It’s a good idea to have a decent wattmeter monitoring SWR when you’re running full duty-cycle modes like FT8 and SSTV. There are lots of good reasons to have one! Right?
What Does It Say?
The LP-100A indicates 88.4 watts at 1.56:1 SWR on 7.074 mhz FT8
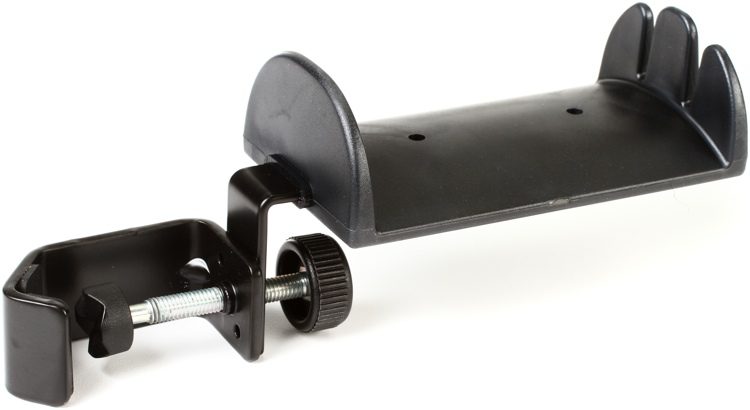
I stumbled across this nifty headphone holder while browsing. I’ve had problems in the past with headsets falling to the floor and getting broken due to improper storage. Konig & Meyer usually has decent build quality, so I gave them a try.
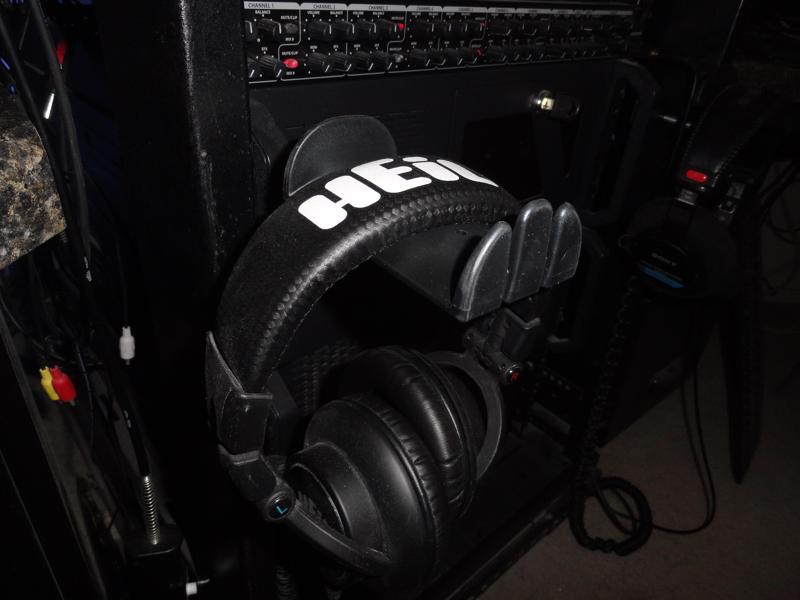
Heil Pro Set Elite properly stored!
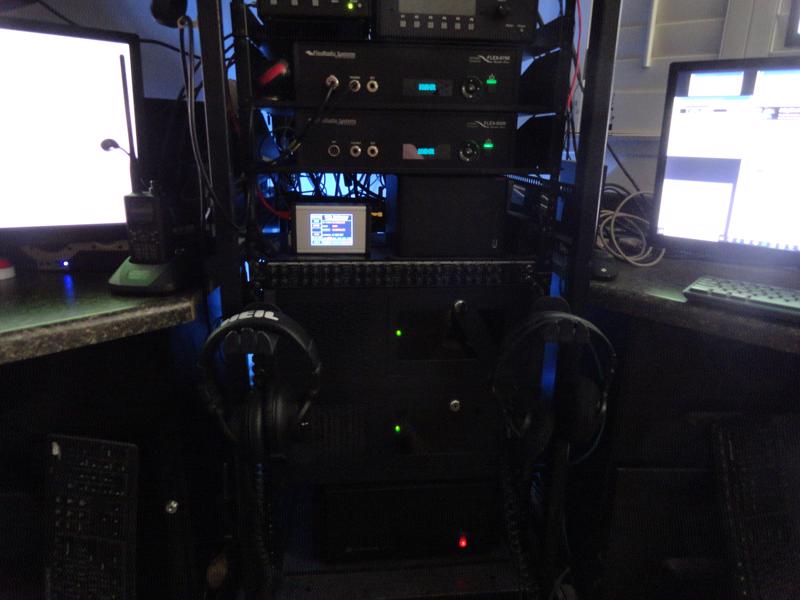
Of Course, I Need Two Headphone Holders…
Dual Headset Holders!
A simple solution to a longtime issue. The yokes on the headsets break easily when dropped. I’ve already had to repair both of my headsets. I’m confident in the KM 16080 solution.
A holder for headphones when not in use. The new headphone holder is simply clamped to the tubes of a music stand or microphone stand, etc. and is generally suitable for a tube diameter max. 30 mm. The soft rubber support can easily take two sets of headphones. In addition, 2 in-ear headphones can also be hung on the slotted front of the holder. The headphones are close to hand and out of harm’s way.
EAN:
4016842820825
Material:
steel
Screw-on to:
tube diameter up to 30 mm
Size when folded:
60 x 70 x 180 mm
Special features:
for up to 2 standard headphones and 2 In-Ear headphones
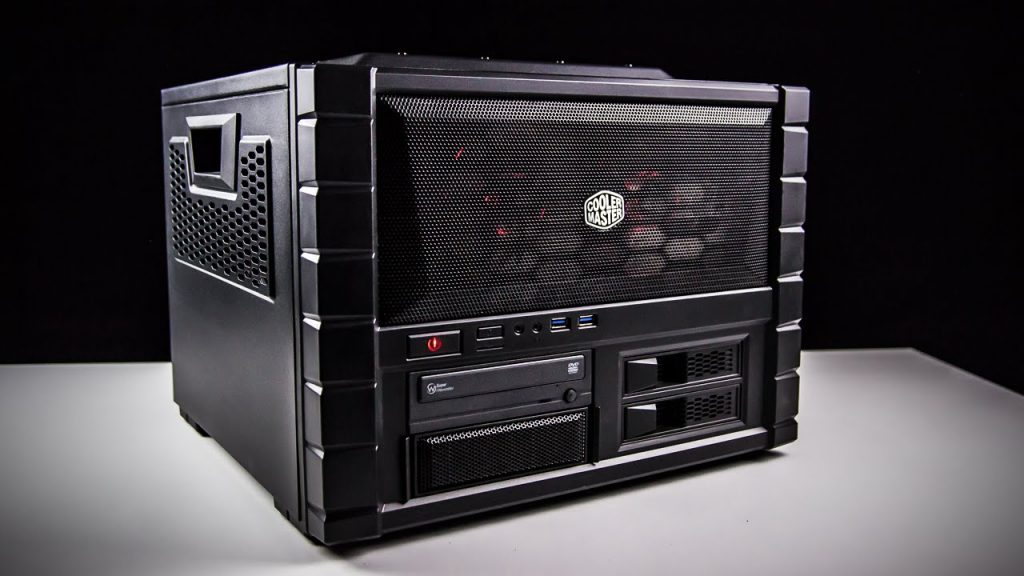
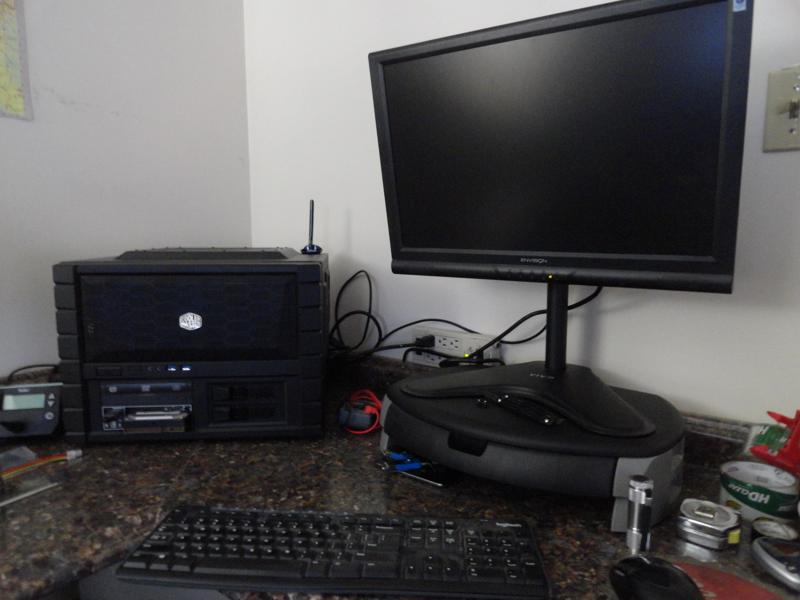
This Intel i7-8700K based PC will be my new office ‘production’ machine. I have some plans in the works that will put this machine to VERY GOOD USE.
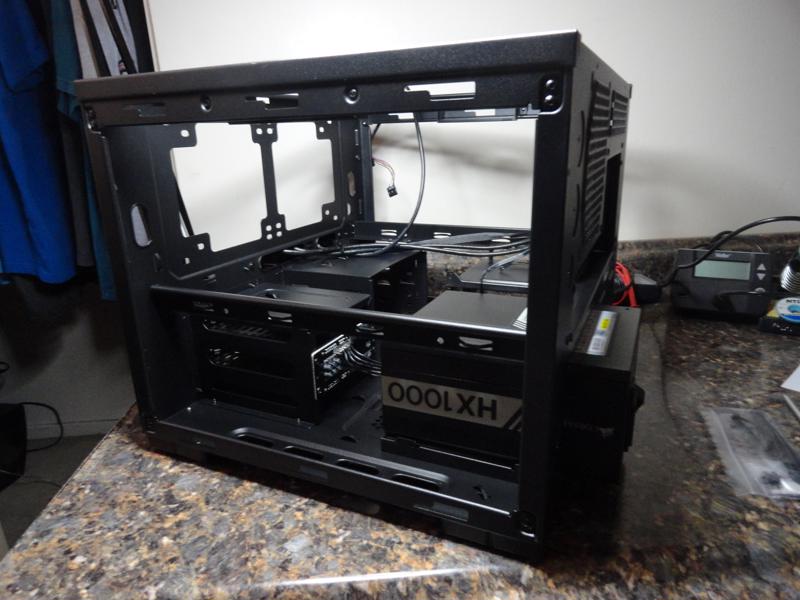
Cooler Master HAF XB EVO – The Perfect Case For This Build!
Intel Z370 motherboard with RGB Fusion, Digital LED support, Dual M.2, 120dB SNR ALC1220, Intel Gaming LAN, Front USB 3.1 Gen 1 Type-C & Rear USB 3.1 Gen 2 Type-C, Smart Fan 5, Anti-Sulfur Resistors
Supports 8th Gen Intel® Core™ Processors
Dual Channel Non-ECC Unbuffered DDR4, 4 DIMMs
Intel® Optane™ Memory Ready
ASMedia 3142 USB 3.1 Gen 2 with USB Type-C™ and Type-A
Front USB 3.1 Gen 1 Type-C™ Header
Multi-Way Graphics Support with Dual Armor and Ultra Durable™ Design
ALC1220 120dB SNR HD Audio with Smart Headphone AMP and WIMA audio capacitors
Intel GbE LAN Gaming Network with cFosSpeed Internet Accelerator Software
RGB FUSION with Multi-Zone Digital LED Light Show design, support digital LED & RGB LED strips
Swappable Overlay for Accent LED
Smart Fan 5 features Multiple Temperature Sensors and Hybrid Fan Headers with FAN STOP
Dual Ultra-Fast M.2 with PCIe Gen3 x4 & SATA interface
USB DAC-UP 2 with Adjustable Voltage
Anti-Sulfur Resistors Design
Ultra Durable™ 25KV ESD and 15KV Surge LAN Protection
Lightning-Fast Intel® Thunderbolt™ 3 AIC Support
APP Center Including EasyTune™ and Cloud Station™ Utilities
Why Not an i7-9700K?
I know, the cost difference is only about $15 so why not just get the i7-9700K. Maybe you have already guessed why! Yes, it’s the number of threads. (9700K 8 threads vs. 8700K 12 threads)
The higher thread count was the deciding factor. Just Google 8700k vs. 9700k and you will see what I mean. I won’t be using this hardware in a gaming capacity. My needs require the higher thread count for processing efficiency not video or sound.
The Hardware is Already on it’s Way
I plan to assemble the machine over the weekend.
UPDATE: “Luck of the Irish”
07/16/2019
A little “Luck of the Irish” today. UPS delivered all the hardware to the wrong address! No problem they say! Only takes 3 to 5 days to resolve!
It’s now 7 to 10 days to resolve. I think I would have the box already if the driver was able to retrieve it the next day. So that box is GONE! Now I have to re-purchase all the items.
The re-odered items are scheduled for delivery tomorrow.
Finally Putting It Together
Cooler Master HAF XB EVO
I found it easiest to install everything on the lower deck first. Once the motherboard tray goes in I wouldn’t be able to fit my hands in there. Connections for the two hot-swap bays, the write-block, optical drive, and two Raid SSD disks were completed first. Once the cables were in place I mounted the power supply. The board went in next, and finally the water cooler.
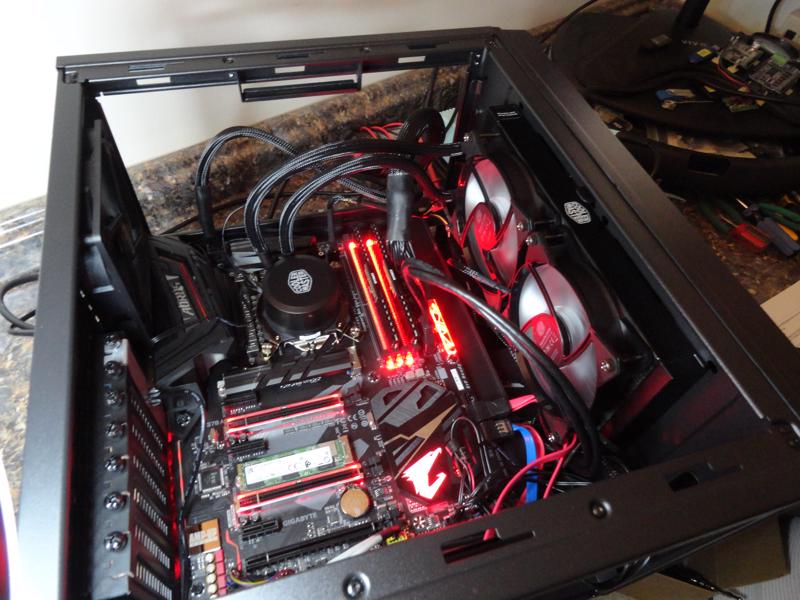
Gigabyte Z370 Aorus is up and running! Later on I changed the LEDs to blue of course!
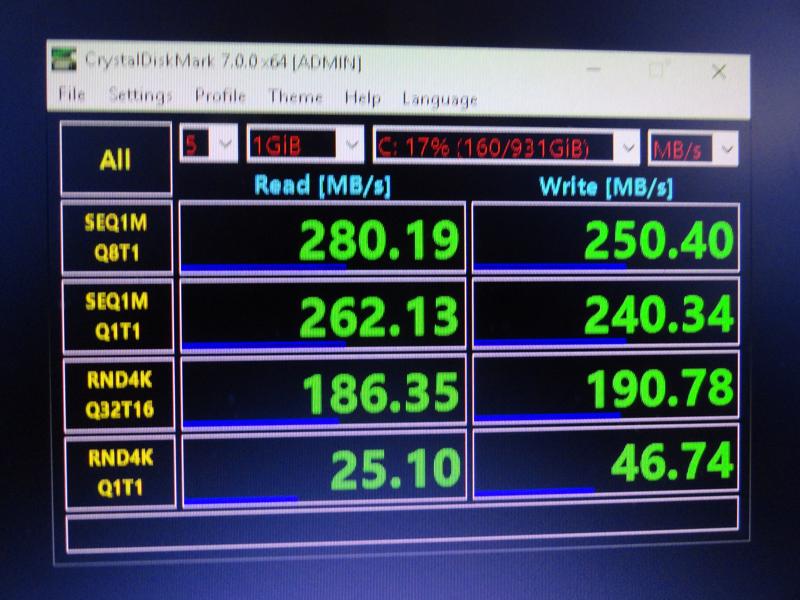
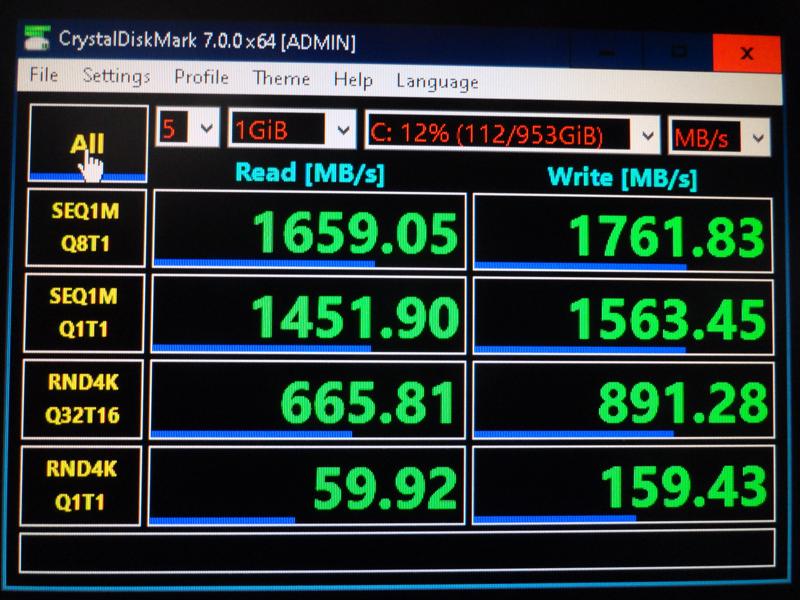
PCIe3 x4 Slot for Intel 660p 1T SSD
It turned out I was looking at the wrong document on the Gigabyte website during my research, and the version of the board I ordered did not include the Optane Memory. No big deal, as the system drive is a 1T PCIe 3 x4 SSD. This drive would certainly not require any ‘acceleration’. As it is, the system boots in 5 seconds! No kidding! The manual calls this “Ultra Fast” boot mode. It delays some hardware initialization until after the OS is booted (among other things). Works for me!
2T RAID 0 File Drive
Dual Samsung 860 EVO 1TB SSD’s configured for RAID 0 provide a 1.8T file space big enough to handle some the large ‘input files’ we’ll be working on later. I anticipate some work may exceed 1T. For now this is a limitation, but not one that will present any real problem getting started. Needing more storage space would be a great problem to have!
Intel i7-8700K Does Not Disappoint!
The Intel i7-8700K cpu runs cool (within spec) and is blazing fast. During the first software run I noticed the cpu was running at +/-4.5ghz. Without a doubt the fastest cpu I’ve ever owned.
My first Experience with Liquid Cooling
The cooler went in easy and the pump was easily mounted to the CPU. I’m seeing 30 Celsius on the cpu which is right on target according to some of the information I’ve seen. I will most likely use nothing but liquid coolers from now on.
Hats Off to Cooler Master for the HAF XB EVO
This case is very well made. It has very precise tolerances in it’s design and manufacture. I can’t tell you how many cases I’ve worked on where the holes don’t line up and the case flexes etc. etc. Not the HAF. Solid as a rock and every single thumb screw lined up perfectly! No wiggle or case bending required! I really like this case!
Fully tested hardware: Ready to start loading software.
a Small monkey wrench!
The Windows 10 Pro 64 bit License Key I purchased on eBay showed up as already being in use. I have purchased a Genuine Microsoft DVD with COA that should be delivered in a couple of days.
While testing one of the software programs I was “kicked out” by Windows (the program was closed) and an “Activate Now” message flashed on the screen. Probably a ‘special feature’ for folks who try to activate using a previously used Product Key!
I’m going to postpone further software installation until I have the activation issue sorted out.
07/28/2019
P.S. Still no resolution to the lost package. I noticed the web results showing the “Signed for by Phillip” is no longer there! Good thing I took a photo of the screen! No worries, there’s no POD for that box! Case closed! Just have to wait the MAXIMUM number of days even though the package had to be known to be un-recoverable by the following day. That was way back on July 17th! Way to go Newegg!
We’ll see what happens on Thursday of NEXT week!
Friday 8/9/2019
Finally! That was one very long wait! July 17 to Aug 9th. Perhaps NewEgg needs to review their account with their UPS representative, so their customers aren’t kept waiting so long for something that was verified lost the following day when the driver went back to get it! Totally unacceptable. But I have to give NewEgg a pass since it was UPS who lost it.
July 11, 2019 – I created a new WordPress site today. The site installed in 5 minutes with no errors. This new site will be business oriented, and will be in development for the next 5 months or so. I have not registered a domain name yet, as I’m still kicking around a few ideas.
July 14, 2019 UPDATE: The ‘Front Page’ of the new site looks great! Too bad I can’t show it to anyone yet. I took a good look through the latest WordPress themes and decided to use the “Business Grow” theme.
Business Grow is child theme of Ample Business. Business Grow is a
clean, simple and professional business theme with attractive elements
and ample of features for business and corporate websites. It is well
suited theme for business, corporate, informative, agencies, travel,
design, art, personal ,woocommerce shop and any other creative websites
and blogs. It features multiple sections on the front page including
favicon, logo, widgets, multiple navigations, address bar, social menus,
and customizer to customize theme easily.
I have also finalized the hardware list for the PC build. Hopefully both elements will be ready in time for a 2020 Grand Opening!
Now that the IRLP Node has been running smoothly for a few months, I’ve decided to try the Nano Node SE with an external radio.
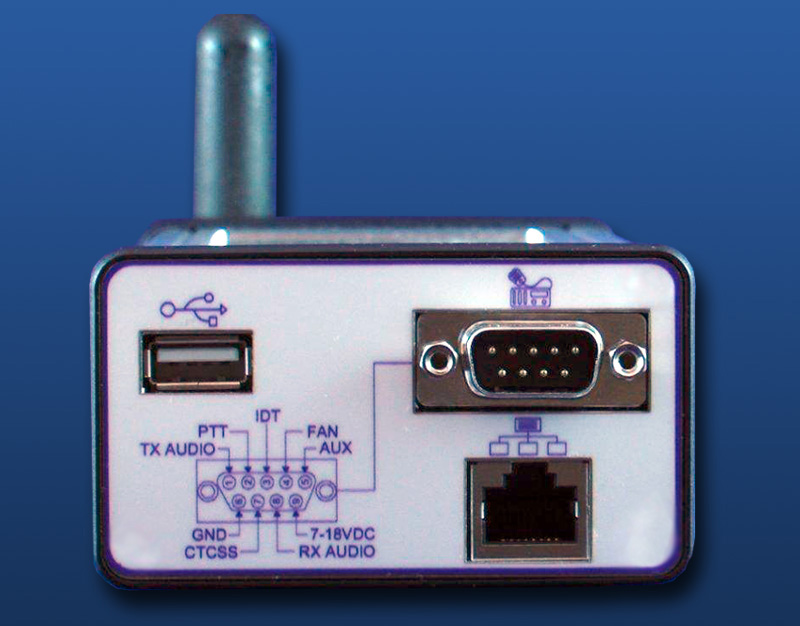
Its internal radio is intended for local use, hence the 0.2 watt output. The Nano-Node SE has an external radio port and it’s time to have some fun with it.
Another model Nano with the same external radio port. I wish my version had that pinout diagram!
Kenwood TM-D710GA
The radio currently under consideration is the Kenwood TM-D710GA. The Kenwood includes APRS and GPS and can be easily connected to the node using the Kenwood data cables.
The Kenwood TM-D710GA is under serious consideration
From the web:
The advanced Kenwood TM-D710GA adds an integrated GPS built right into the head. You will have a full 50/10/5 watts on both VHF and UHF. Key features include: internal clock for APRS® (Automatic Packet/position Reporting System) time and date stamp, APRS sort function, APRS filter function, APRS QSY function, APRS decay algorithm, APRS, proportional pathing, APRS voice alert, EchoLink ready, NOAA weather, 1000 memories and a sound card interface is built in. Versatile message with 100 messages (up to 67 characters each) is supported. There is also a NMEA 0183 GPS I/O port. And it can be employed as part of Kenwood’s Skycommand System II+ when used with the TS-2000 series. The screen may be set for orange or green. There is a clock/date function.
Kenwood PG-5A / PG-5G Data cables
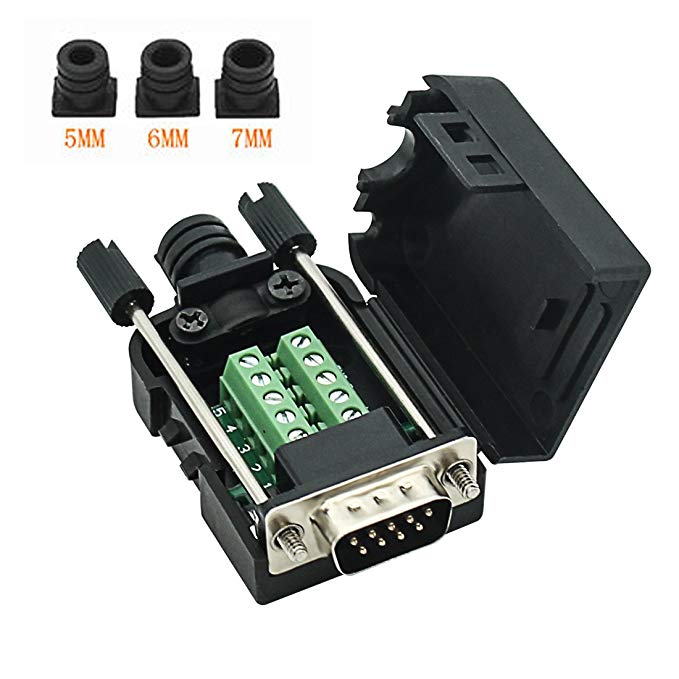
DB9 with Terminal Block!
DB9 w/ screw terminals! Should make life a little easier when building the external radio cable
I could have purchased a pre-assembled data cable for $48. Instead I purchased the PG-5A cable and will attach the nifty DB9 connector shown above and save a few bucks. If I change radios the connector will come in handy again.
9/28/19 UPDATE:
I ordered the Kenwood TM-D710GA today. I didn’t see anything else that really came close for digital modes. It fits my needs perfectly for this upgrade. Besides, I already own a Kenwood TH-D74 handheld, so these should work great together.
The screw terminal DB9 has arrived, and the data cables are on order with the radio.
Comet GP-3
Dual Band 2M/440MHz base antenna Small profile, good gain, excellent construction.
Gain: 2M: 4.5dBi 440MHz: 7.2dBi VSWR: 1.5:1 or less Max Power: 200 watts SSB/100W FM Length: 5′ 11″ Weight: 2 lbs. 12 oz. Mounting Mast Dia: 1.25 – 2.50″ Connector: SO-239 Construction: Heavy-duty fiberglass
I will be adding a 5ft section to the existing 5ft chimney mast and mounting the Comet GP-3 at the top. Just under the GP-3, I’ll be mounting the packet radio antenna, and positioning it for best signal path to AA6HF. This should be an improvement for the packet radio operation here, as the current antenna height is right at the tree level. Setting the antenna at 5ft above the tree line has to be an improvement. The GP-3 will be connected using CNT400 coax
I’ll be looking into connecting the radio as an APRS iGate.
One of the main reasons for installing this upgrade is so I can get IRLP whenever I want it without having to depend on some other system that I have no control over.
Recently I discovered I could no longer copy the Alaska Morning Net on my scanner radio at work. I can only guess that there was a node nearby, close enough, that I could hear it transmitting the AMN on 449.16 and now that node has ceased operation.
With my own IRLP node, I’ll be able to participate in the net, where before, I could only listen. Should be fun to check in!
update: 10/4/19
Kenwood TM-D710GA takes it’s place in the shack..soon to be the new node radio
I picked up the Kenwood TM-D710GA Dualband transceiver today. Over the next day or so, I’ll be programming the radio and putting together the ‘external radio’ cable used to connect the Kenwood to the Nano-Node SE.
Data Cable from TM-D710GA to Nano-Node SE
update: 10/7/19
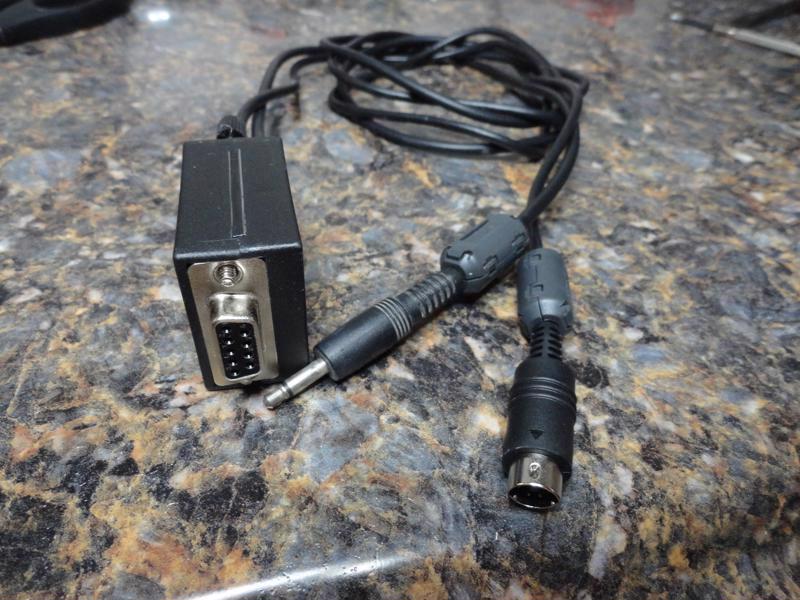
I assembled the ‘external radio’ cable today. It was super easy using the nifty DB9 connector (with screw terminals).
My Homebrew Data Cable for connecting the TM-D710GA to the Nano-Node SE
All you need are a female DB9, a Kenwood PG-5A Data Cable, and a 3.5mm T/S audio plug, and in no time at all, you’ll have the radio and node up and running!
PG-5A to NANO SE
PIN 1 BROWN >>>>>>>>>>>>>>>>>>>>>>>>PIN 1
PIN 2 RED >>>>>>>>>>>>>>>>>>>>>>>>>>PIN 6
PIN 3 WHITE >>>>>>>>>>>>>>>>>>>>>>>>PIN 2
PIN 6 BLUE >>>>>>>>>>>>>>>>>>>>>>>>>PIN 7
3.5MM AUDIO to NANO SE
TIP >>>>>>>>>>>>>>>>>>>>>>>>>>>>>>>PIN 8
SLEEVE >>>>>>>>>>>>>>>>>>>>>>>>>>>>PIN 6
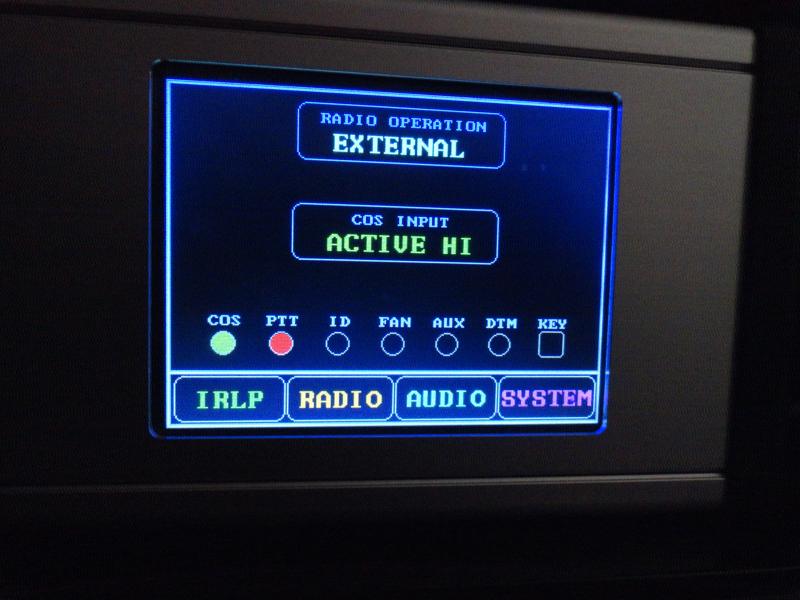
TM-D710GA Setting for COS Signal
After connecting the radio and Nano SE, you have to go into the Radio menu and change the default setting for SQC SOURCE in order for the node COS to work correctly. When you switch to ‘External Radio’ on the node, a button appears that reads “COS Input: ACTIVE HI” You now have to set the radio to generate the correct signal to enable the node for TX. The node is expecting ACTIVE HI from the radio by default. I did not change this setting on the node.
NANO SE with Kenwood External Radio – Before “COS” configuration.
With the node COS activated by the “SQL” signal, and the squelch controlled by a CTCSS tone. The radio squelch will only open for a valid (desired) signal, thus, no unwanted signals will be sent to the internet.
Access the radio menu #921 “SQC SOURCE” and change this setting to “SQL” and you are ready to go. It’s worth mentioning that the TM-D710GA does not pass the CTCSS tone through the rear data connector. The IRLP gurus would prefer that the radios used for nodes be capable of passing the CTCSS. Lucky for me, it’s not a deal breaker. COS derived from a CTCSS coded squelch condition is deemed acceptable. (just not ideal)
Take a minute to adjust the audio mixer on the Nano-Node. I adjusted mine using the little touchscreen. The audio sounds GREAT, and I received a rating of “excellent” from one of the WinSystem controllers.
My settings are “XMIT 32” and “RECV 81”. A quick check through the IRLP test reflector [9990] verified the settings sound good.
On The Air Test 10/10/19
IRLP Node 3689: So far so good on 439.025
Shortly after putting the node on the air using the default frequency of 446.875 I was notified by WinSystem Controllers that my node was sending intermod noise to the IRLP system. I checked the IRLP Status page looking for nearby stations, and sure enough, there was another node nearby also using the default settings.
The IRLP Status Page allows you to enter a radius showing other nodes within a selectable distance. So, I looked at 50 miles, and sorted through the UHF frequencies in use. I also looked through the repeater directories and ultimately came up with 446.8 Mhz for my operating frequency with a CTCSS tone of 100hz . I’ve had the node connected all day today for the first time. I’m watching 446.8 on the panadapter of my Flex VU5K. The frequency has been quiet, and so far, has had nothing close enough to create a problem. I’ll keep an eye on it, and hopefully I can settle on this frequency.
UPDATE: 10/16/19
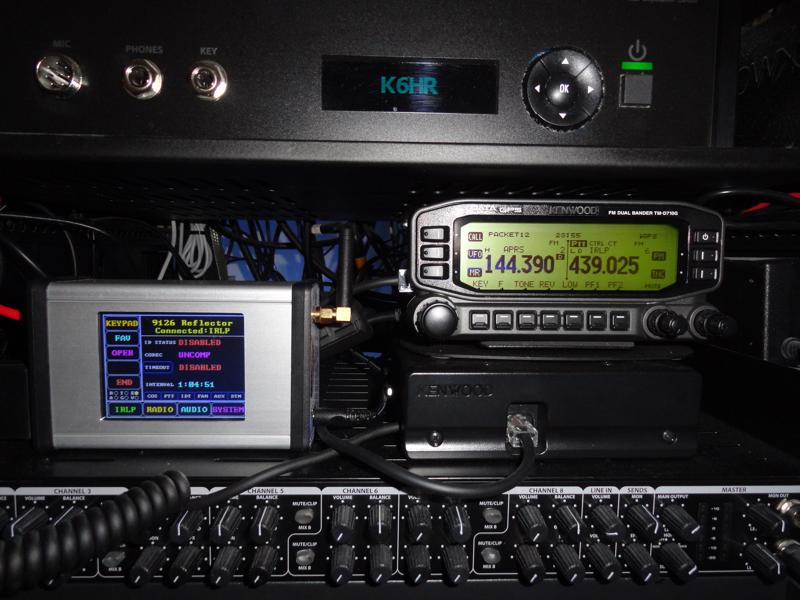
Node moved to 439.025 to avoid a conflict.
I Love it When a Plan Comes Together!
The NANO-NODE SE and Kenwood TM-D710GA are fully integrated and working flawlessly together. Now on to the final stage of this upgrade.
Roof Work
I have the GP-3 in the closet for the time being. The roof work is something I don’t look forward to. However, there are a few things on the roof that require attention:
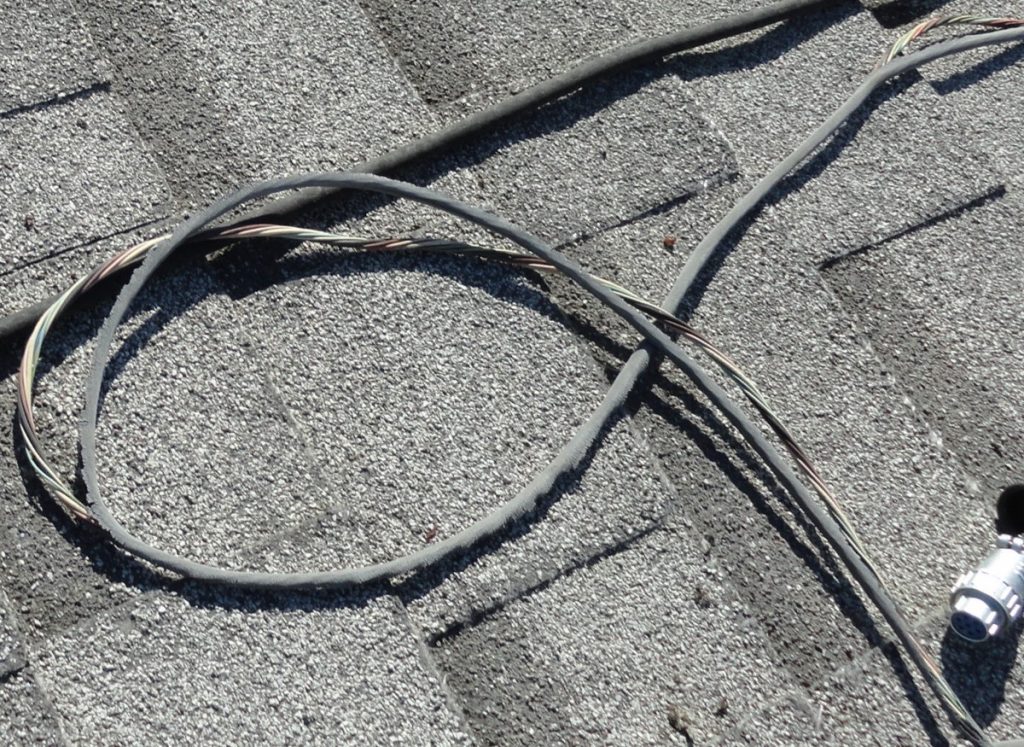
Replace the 15 year old rotor cable that has been destroyed by the sun. The HF antenna hasn’t turned in over a year!
Satellite antennas need to be realigned and tightened in place.
Mount the GP-3 and my packet radio antenna on the 10 ft. chimney mast.
I’m planning to complete the roof work on the first day of my upcoming vacation near the end of this month. The plan is to have the HF antenna turning again in time for the CQ WW SSB Contest.
update: 10/20/19
Roof work complete!
The GP3 is several feet above the tree line, and the packet antenna gained 5 ft. putting it just above the tree line. I may try swapping these antennas at some point to see if there are any advantages.
Comet GP-3 at top of 10ft chimney mount mast. Packet antenna mounted just below it.
I replaced the rotor cable and the rotator is working again! The sun literally burned the insulation off the rotor cable right down to the copper conductors! I turned the rotor off after noticing the pointer on the controller was not moving with the antenna, that was back in 2017!
When I saw the condition of this cable I disconnected it. It wasn’t hard to imagine that the shorted rotor cable would likely blow-up the controller if it remained connected and energized.
Sun-Dried Rotor Cable! The intense SoCal Sun Burn! 15 year old cable finally replaced.
I’m happy to have the rotator back in service. I have it connected to DX Lab, so when I click on a spot, the antenna automatically moves to the correct bearing for the DX station. It’s very handy to turn on this feature during DX contests!
Last but not least, I re-positioned the satellite antennas. A very strong wind event had blown them about 17 degrees off azimuth. This didn’t affect operations, as I entered the offset into the rotor control software. It is nice to have them squared away.
ANTENNA UPDATE: 10/22/19
The antenna is not nearly high enough to get the coverage I was hoping for. However, the limitations are what they are, and this is the best height (HAAT) I’ll be able to achieve at this QTH. The coverage is great all around town and the surrounding neighborhoods and that’s where it will get the most use anyhow.
Project Complete!
This upgrade is a wrap! Now I can move on to testing the range of my IRLP node, and fine-tuning the APRS software. Great fun to say the least.
This is a nice upgrade to have in place as we wrap up 2019! Time to start looking into 2020 upgrades!
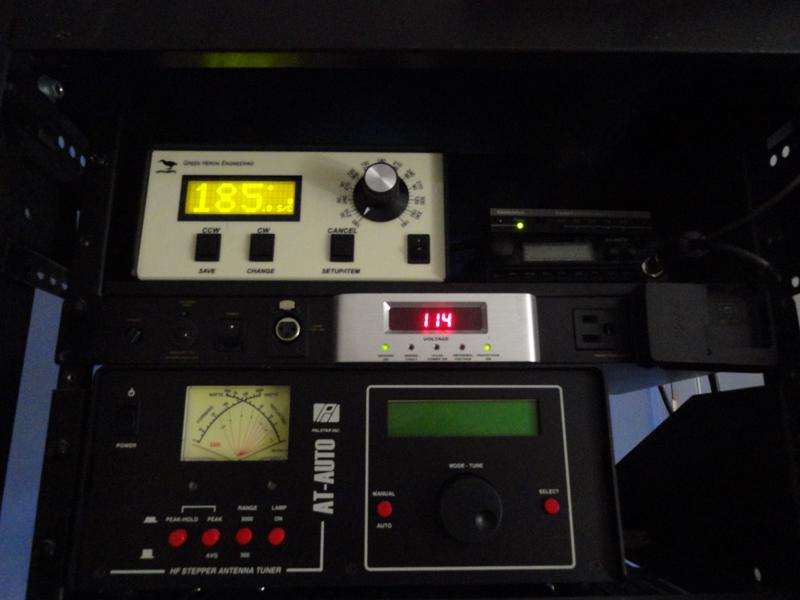
Just SCORED a used Green Heron RT-20 Rotator controller.
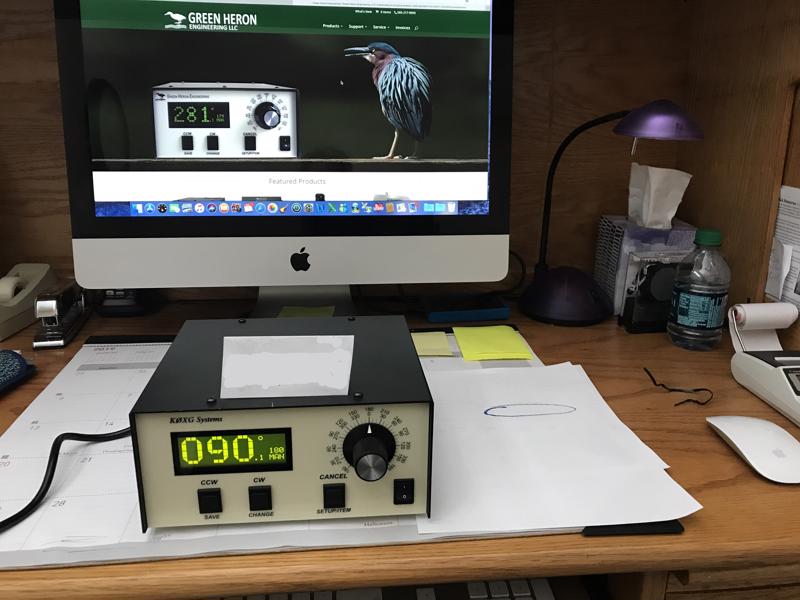
Green Heron RT-20
It’s time to upgrade my HF antenna rotor controller.
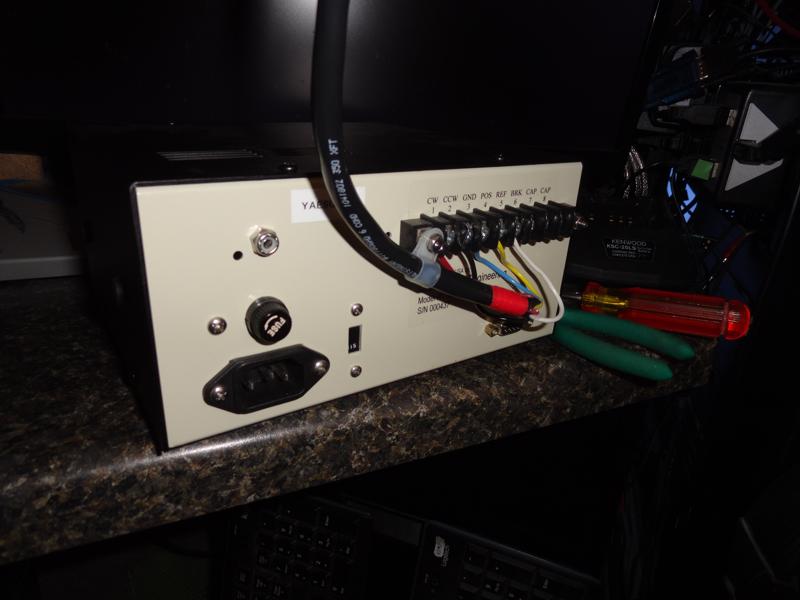
Green Heron RT-20 is wired up!Green Heron RT-20 takes its place in the shack! 11/14/19
Update 11/14/19
I finally found some time to get the RT-20 wired up and into its place in the shack. The connection to the PC is working and tomorrow I will calibrate it!
Update 11/15/19
The antenna is off azimuth. High winds had blown one of my VHF antennas into the path of the HF antenna, causing the HF antenna to get bound up on it. It happened during the CQWW contest back on October 24th. I went up on the roof and cleared the hang-up but did not realize at the time that the HF antenna was knocked off azimuth.
It’s off azimuth enough that it requires another climb up on the roof for correction. I’ve put an offset in the controller for the time being to make it line up temporarily.
Update 03/04/20
I’m on vacation and finally had some time to go up on the roof and aim the antenna for a north center of rotation. The antenna is pointing in the right direction and I have the fantastic advantage of the north center. This means I can get to where I need to be a lot faster than I could before. Just in time for the ARRL DX Contest this weekend! The Green Heron controller also plays nicely with DXLab.
The Green Heron owners manual was spot on and easy to understand so I was able to get it calibrated quickly.
It’s Time For A Change
change south to north center of rotation
When I first installed the HF antenna I aligned it north for a “South Center of Travel”. I quickly learned that in order to turn from Europe to Japan (a direction I often travel) the antenna had to travel nearly the entire range of rotation to get to JA land. It didn’t bother me enough to change it, and I have operated that way since 2004.
With the addition of the Green Heron RT-20, and the need to correct the antenna’s physical azimuth, I have decided to make the change to a “North Center of Travel” as this is really what makes the most sense for my location. This will enable me to point in any direction without all the ‘extra travel’. Also, by utilizing the 90 degree overlap, I’ll also be able to point to VK/ZL turning from South America without any excess travel. I should have had it this way from the start. So I’ll leverage this opportunity to finally set it right.
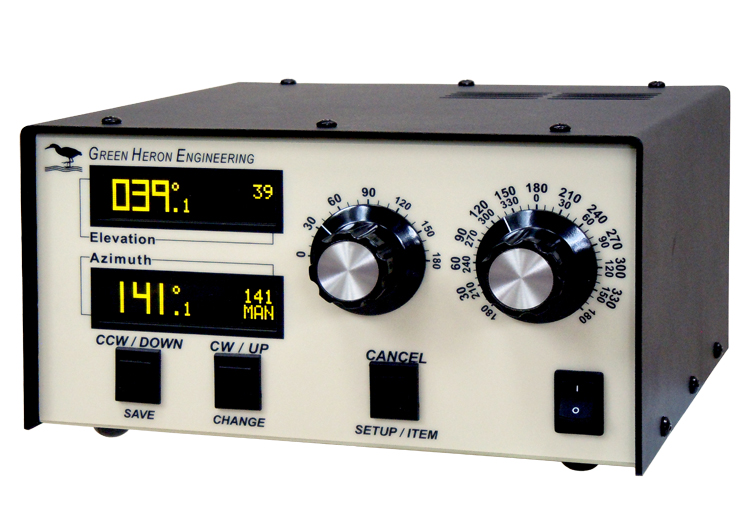
Green Heron RT-20 Standard Description:
The RT-20 is a universal digital rotator controller that can be user configured for motor voltage and position feedback. RT-20 configuration is accomplished by a combination of PCB jumpers and software settings, there’s no soldering or major disassembly required. This flexibility allows the RT-20 to operate any commercial amateur rotator being built today, and virtually any rotator ever built.
Why upgrade your controller?
The addition of an RT-20 will add modern functionality to your rotator:
RS-232 control
High resolution digital display
Point & Shoot hands off operation
In most cases, improves heading accuracy
In most cases, adds PWM speed control and gradual start/stop to your system eliminating tower and rotator stresses
The RT-20 manual contains separate pages detailing the setup, hookup and calibration of 14 of the most common rotators in use. Additional resources are available from Green Heron in the form of applications notes, that detail less common or custom requirements.
Common Rotators Supported and Documented in the Manual:
Hy-gain HAM series, T2X and HDR-300
Create RC5 series
Yaesu All models
Orion 2800 and 2300 models
TIC RingRotor
Prosistel
Alfa-Spid
Alliance HD-73
Rotor Doctor (CATS)
Diawa MR-750/MR-300
Specifications:
Size/Weight
Approx 4” x 8” x 7” HWD (Not including rear terminal strip)
Approx 8 lb – Shipping = 11 lb
Input Power
115/230 VAC 50/60 Hz
Standard IEC power connector and 5x20mm GMA fuse
Display
High contrast Yellow-Green backlit FSTN LCD
Eight brightness levels w/auto-dim
Front Panel Controls
CCW, CW and CANCEL buttons (Operating)
SAVE, CHANGE, SETUP buttons (Setup)
Point and Shoot knob (360º = full rotation)
Motor Power (Selectable voltages @ 5A)
18 to 36 VAC
12 to 48 VDC
115VAC (call)
External Relay Control
CCW and CW DC relay control (12V or 24VDC relays)
various configurations
Operating Modes
Normal, Master/Slave, Master/Counter Rotate, Slave/Counter Rotate, Debug, Alt Offset
Selectable Options (specific Rotator Settings)
POT, Counter, HAMx, T2X, Orion, TIC-PST, SPID
Position Feedback Mechanisms Supported
Potentiometer 150 Ohm to 10 kOhm
Variable resistor 500 Ohm (Others accommodated with minor modification)
Proximity/reed switch or Hall effect up to 64 pulses/degree (divide ratio up to 23,500)
2-Bit rotary relative encoder (special order)
Others possible
Position Accuracy
Up to 1/3º for potentiometer
Up to 1/10º with proximity/reed switch
Brake and Reversal Delays
0 to 6 Seconds
Soft Limits
+/- 180º from normal stop
Restricts rotation to zero or opens to 720º
Motor Speed Control (PWM)
10% to 100% in 10% steps with 10 selectable start/stop ramp settings
100% no ramps
Computer Control
Compatible with all DCU 1 enabled programs
Expanded Protocol for GH Tracker and SETUP UTILITY (See manual)
Configuration
User changeable in minutes with no soldering
Protection
No Motion feedback
Pot out-of-range (TIC-PST Option)
Counter Range Error (Orion, SPID, Counter)
Industrial rated Transient Voltage Suppressors on all external terminals
Rear Panel
8 Position barrier strip #6-32
Ground stud #6
Cable strain relief
DB-9 RS-232
Of course, one of these would also come in very handy!
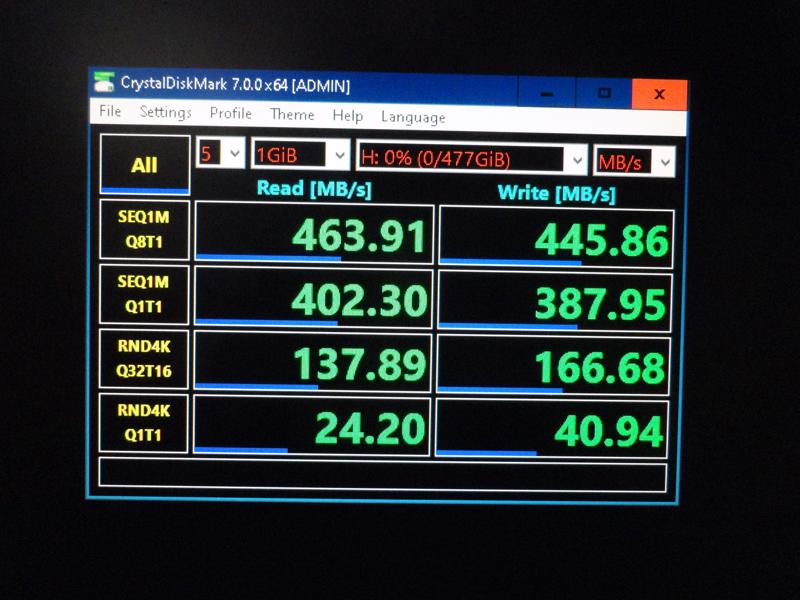
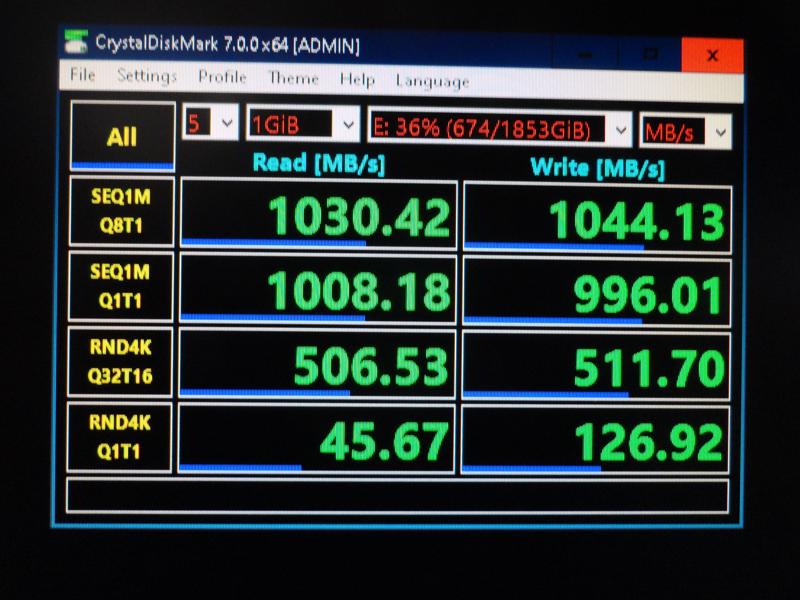
I just picked up a CORSAIR Voyager GTX 512GB USB 3.1 Premium Flash Drive Model CMFVYGTX3C-512GB. Initial testing shows it lives up to it’s claims of SSD like read/write speeds.
Corsair Voyager GTX 512GB USB 3.1 Flash Drive @ USB 3.0
Corsair Voyager GTX 512GB USB 3.1 Flash Drive
The benchmark test results shown above actually exceed those published by Corsair. They’re advertising speeds up 440 MB/s. This test was run on an i7-8700K CPU 32GB RAM using a USB 3.0 port.