These web pages describe my station’s construction and operation. They also include some personal reviews, recommendations, and links to relevant information. I try to offer some insight into the research and planning stages of the station build.
Check back for updates to what’s going on here in the shack. I’m always building or improving something related to Amateur Radio, and I’ll post my findings here, in the event others may be interested.
Some great news this weekend! The LP-500 is bought and paid for, as is the Flex 6500 and the Comet CHA-250B. I was also notified by the Flex Service Dept. that my 6700 is ready. The FlexRadio units will arrive together on Friday, and hopefully the LP-500 arrives around the same time. All hardware in transit!
These are the last few items to complete the station. Once installed, the radio rack will be moved back into the operating position, and the shack furniture will be put back into place.
I’m a week away from wrapping up all the new hardware! Hardware in transit is a good thing!
The Flex 6700 is back from repair, and the frequency drift problem has been taken care of. The radio is now stable and able to decode FT8 and other digital signals. There’s no sign of drift on WWV. The Flex 6500/6700 were installed today, and are now in service on the air!
The new Flex 6500 will be dedicated to decoding the various HF digital modes. I plan to move the Live SSTV Cam over to the 6500 once I have the Comet CHA-250B installed.
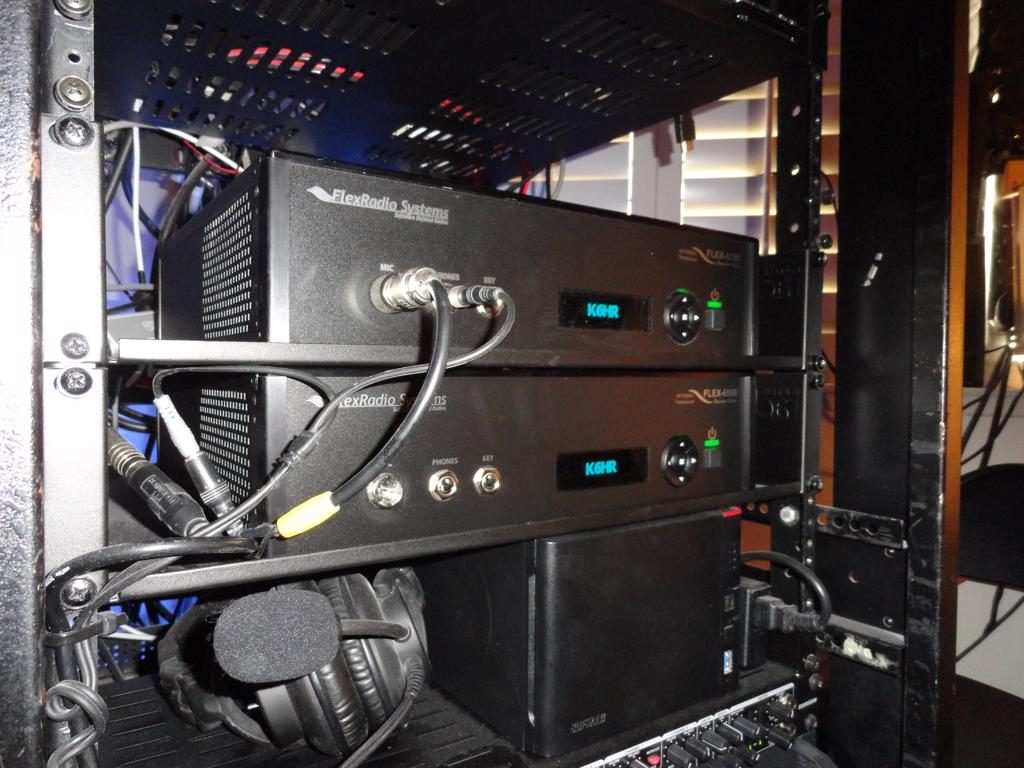
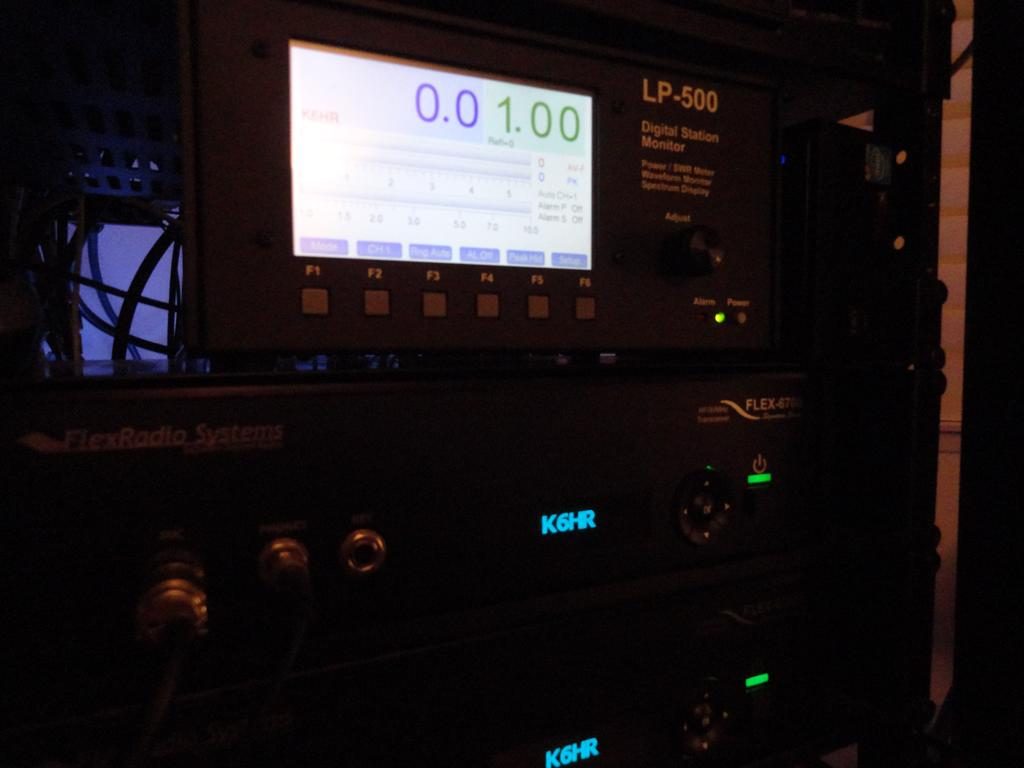
Just enough space left for the TelePost LP-500
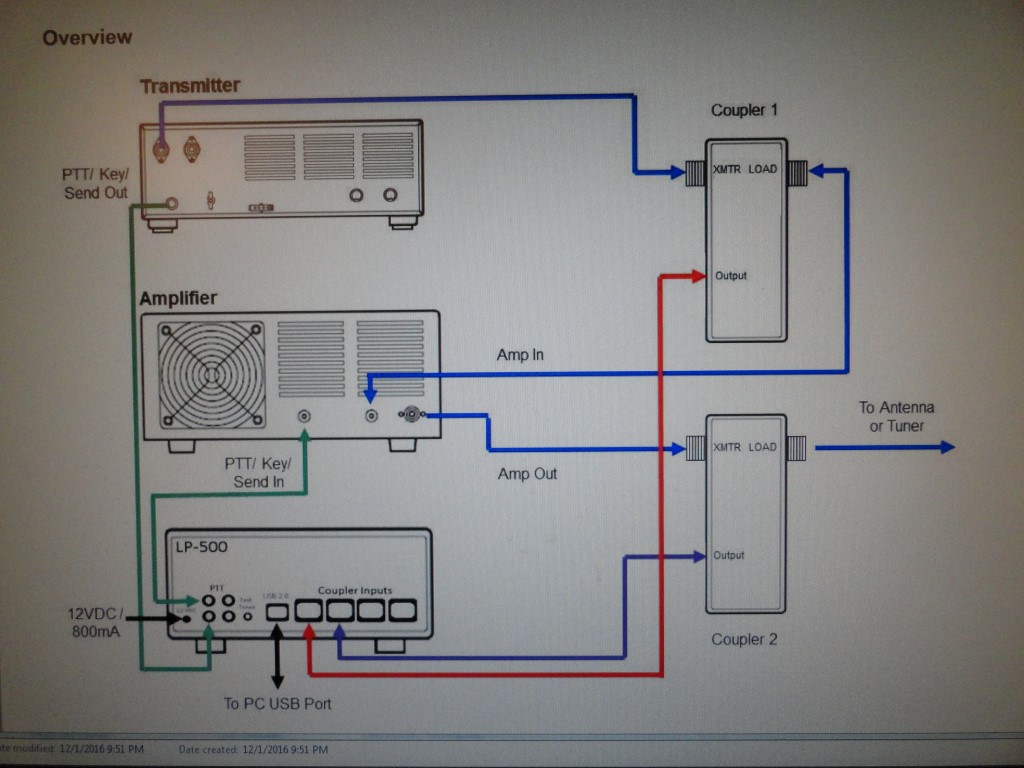
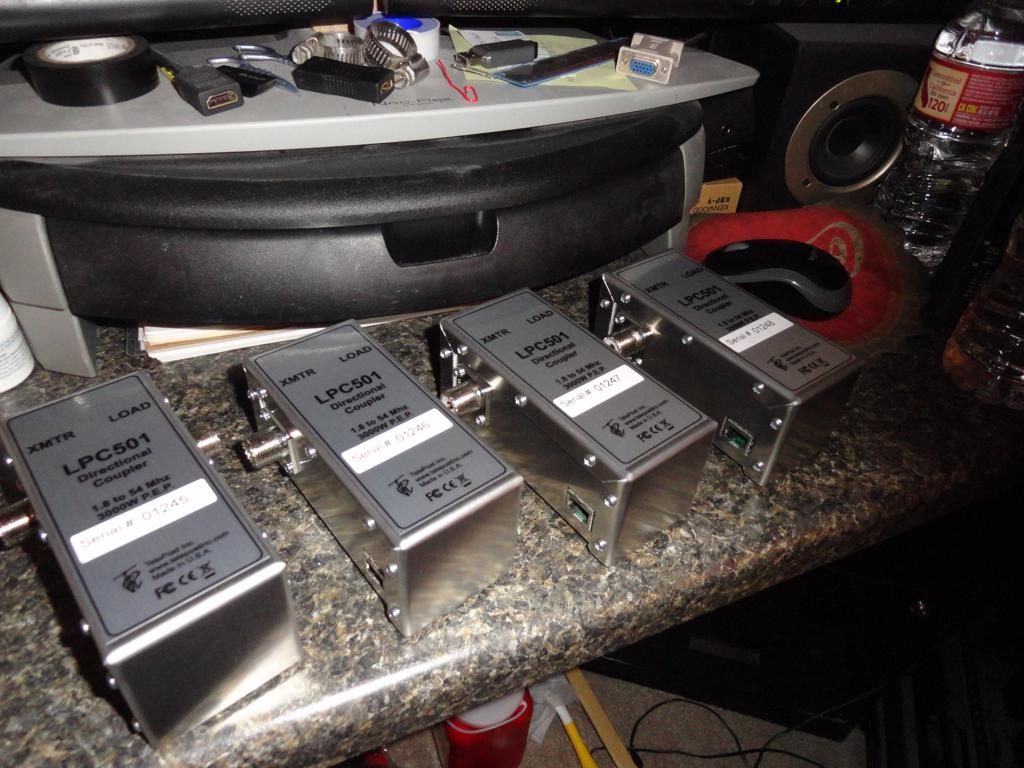
The station monitor should arrive this week. I have just enough rack space left to fit the LP-500 between the 6700 and the SPE 1K-FA amplifier. I will install the LP-500 utilizing 4 couplers to enable viewing of amplifier linearity with a trapezoidal display on both channels of the amplifier.
Single channel amplifier configuration
The illustration above shows the configuration for a single amplifier. Since the SPE 1K-FA has two inputs (one for each of the 6700’s SCU’s) I will duplicate this configuration for the second input/channel.
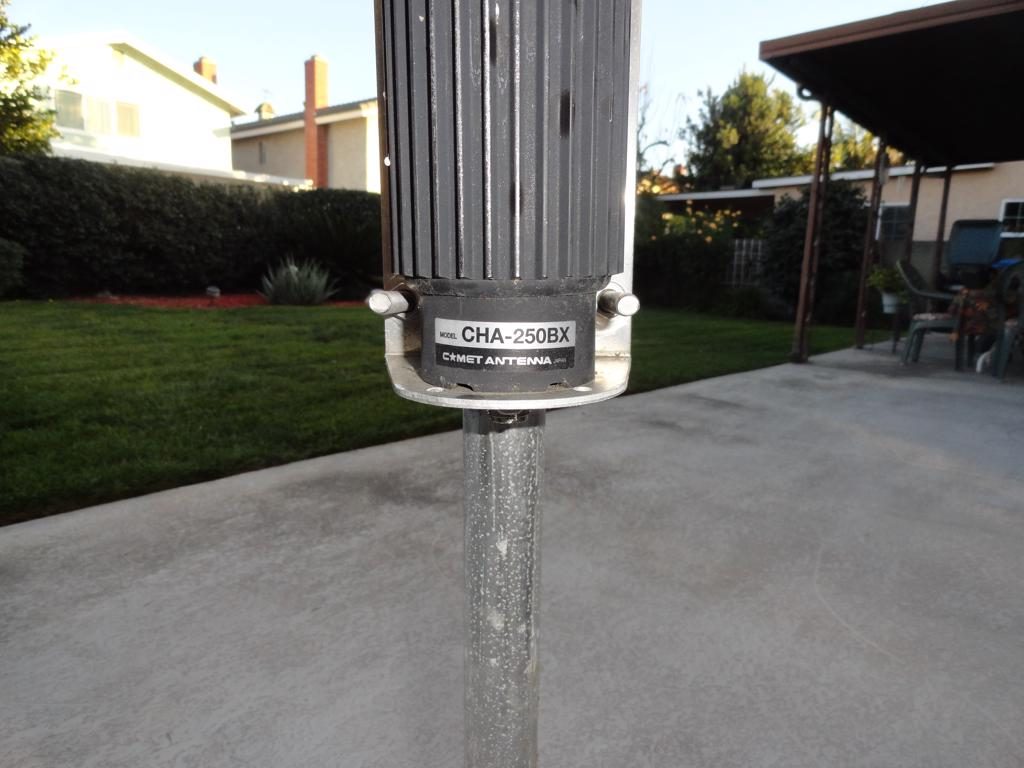
The Comet CHA-250BX was delivered a few days ago. Today I assembled it and mounted it on a ‘test stand’ in the back yard, next to the W6LVP Loop. Tomorrow I will run some LMR-400 coax down there and we’ll see how the 6500 plays on this antenna. Right now the 6500 is connected to a non-resonant dipole antenna, so here’s to hoping the vertical does a much better job.
The CHA-250BX will be ANT1 on the 6500
Before I can run the coax I have to replace the cover on the window in the shack. The current window covering is a piece of heavy duty art board of some kind. This art board material was never intended for use that would expose it to the elements. It is weathered and it’s shape is distorted, so it must be replaced. I plan to install a piece of Optix Acrylic to cover the open space above the air conditioner. I have a L-R sliding window so I’ve had to cover this open space ever since getting the air conditioner. Once this is complete I’ll have a better pass-through for all the cables. I also hope to pull in some of the rotor cable slack off the roof, into the shack, so I can reconnect the satellite rotors.
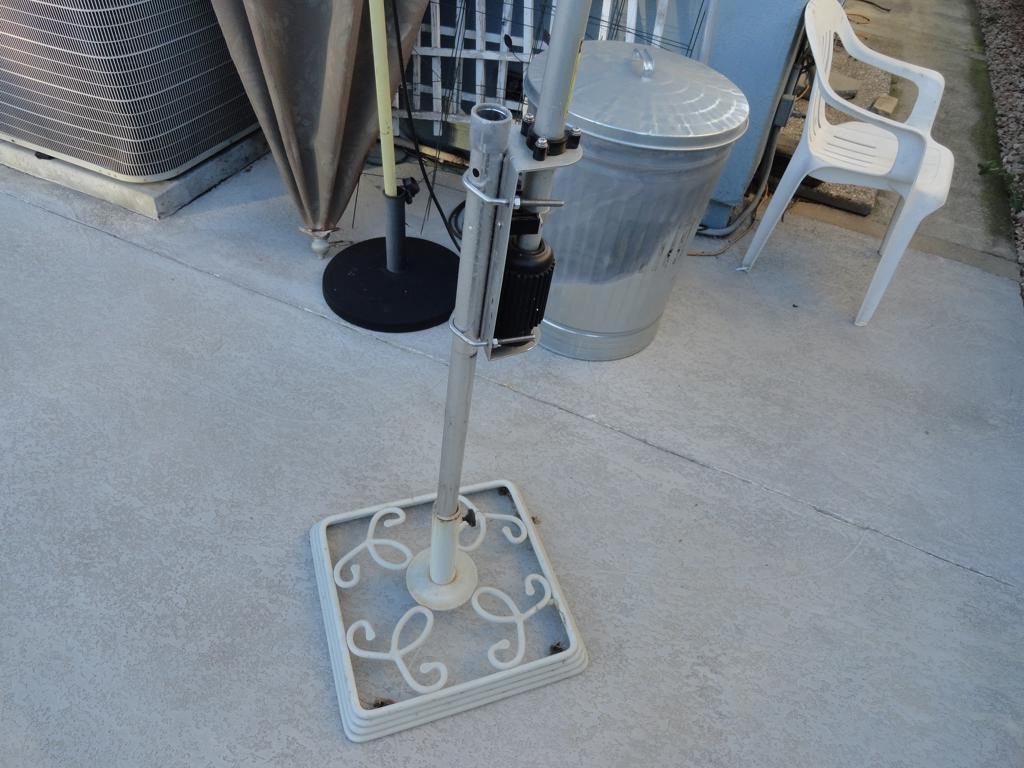
I’ll add a couple of sand bags for good measure
My ‘test stand’ is the bottom part of an old umbrella stand. It seems to hold up OK but I’ll probably add a couple of sand bags.
Everything they said about it is true!
The CHA-250BX performs exactly as claimed. I replaced the window and ran the coax today [SAT 12/22] and the 6500’s internal tuner tunes this antenna fairly flat on all bands! 1.3:1 was the highest reading I observed today. I’ll post more exact results later on.
This antenna will be used primarily as an RX antenna for SSTV/Digital modes. Low power, 100 watts max TX, “bare foot” no amplifier. I managed to tune through a few bands this afternoon and so far it looks like a winner.
Just what I needed in a wideband antenna!
Santa Claus will be a day late with the LP-500 (it’s arriving WED). The LP-500 is the final component of the 2018 hardware upgrade. I joined the LP-500 waiting list in May 2018 at number 200 something, these days, the list is much shorter as they catch up to demand.
Once the installation of the LP-500 is complete, I’ll be looking forward to “buttoning everything up” with the radio gear and reinstalling the shack furniture.
Don’t forget the Geochron 4K!
When the shack furniture is back in place, I can finally install the other LG 32UD59-B 4K UHD monitor and Ergotron Arm! This monitor will display the Geochron, and I can tell you right now, it looks killer!
I’ll use the Geochron to learn how to work, and better understand, the “Grey Line“. I hope to develop some new DX’ing skills in the process. Working Grey Line DX will be a new thing for me to look forward to.
On another note…
I was unable to pull in any significant amount of the slack in the satellite rotor cables. It will require a roof climb. My HF rotor also needs it’s control cable replaced (after 14 years in the SoCal sun) So these will be done at the same time, but no time soon. It’s time to get operating.
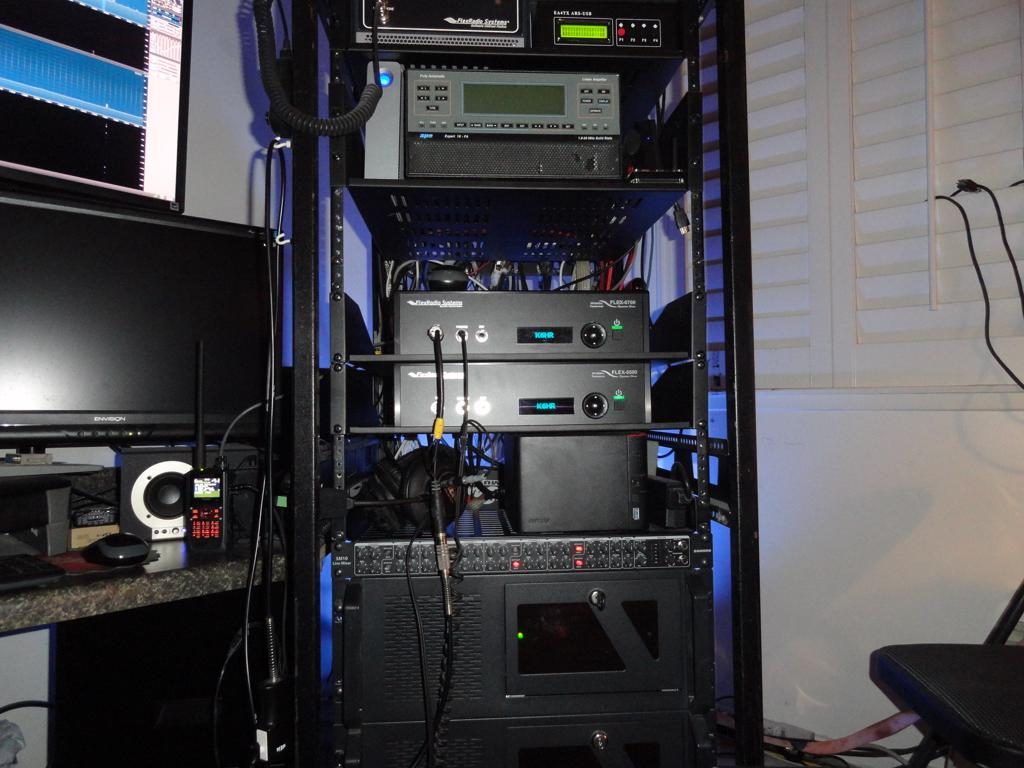
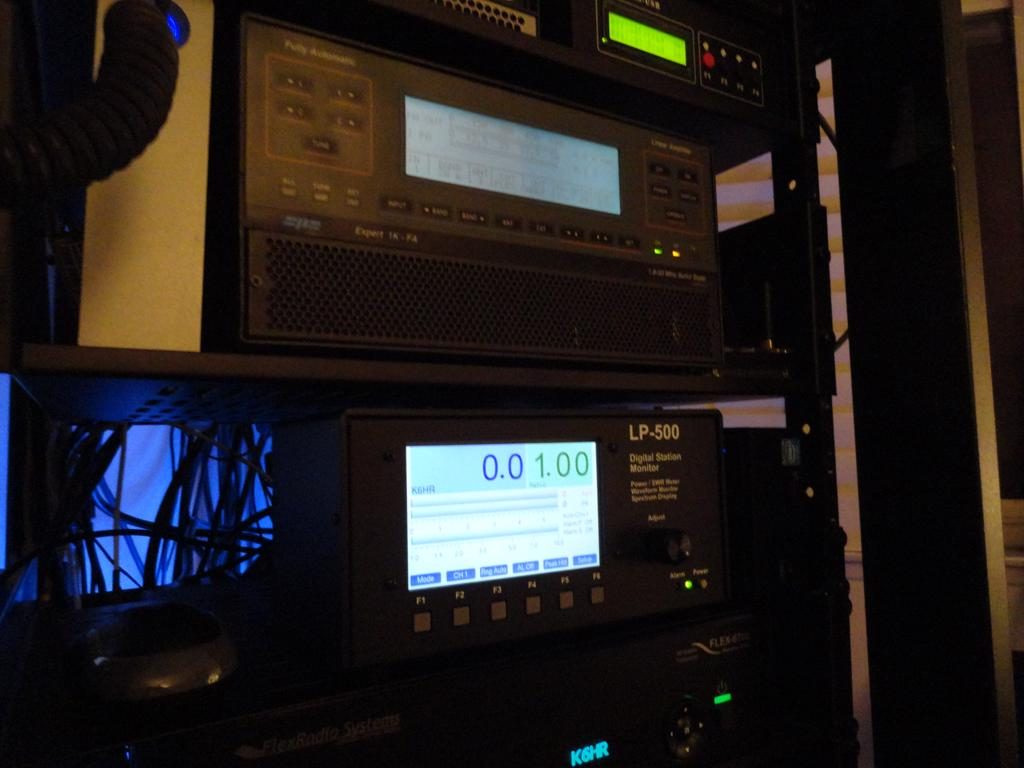
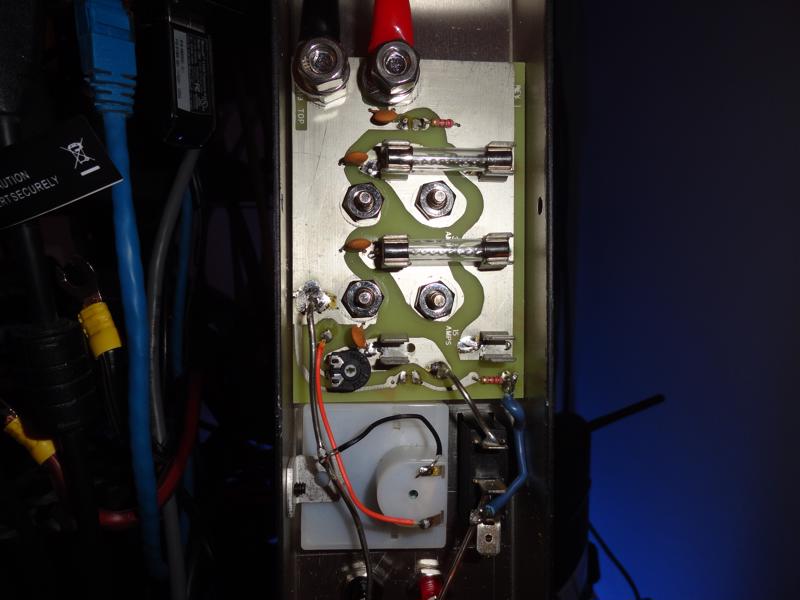
The TelePost LP-500 installed today without a hitch, using 4 couplers to enable the trapezoidal linearity display.
LP-500 installed with 4 HF couplers
The LP-500 was the last piece of the 2018 Hardware Upgrade to be installed. The station hardware is now complete, and fully tested. Now that I no longer need to get behind it, I can finally push the rack (very carefully) back into the corner and return to full ‘mega-enhanced’ operation.
SPE Expert 1K-FA should play nice with the LP-500!
Once the LP-500 was in circuit I ran some tests using my current radio and amplifier settings. Boy was I in for a surprise! The station monitor quickly revealed that my signal was in need of some serious adjustment.
My Signal was Non-Linear
My signal was non-linear. Prior to the LP-500 I adjusted the exciter drive level according to the output displayed on the amplifier (eyeball method). I’d always received good reports and so I assumed all was well. I was running the amp to maximum output with minimum SWR, and no amplifier faults and thought I was making the best use of the amplifier.
My entire gain structure needed to change, starting with the microphone level and working through finding the ideal drive levels for each band. I quickly found out the LP-500 would make this work both easy and verifiable. I worked the RAC contest a bit today and made adjustments in the process. I’ll spend the next week or so creating and editing profiles until I have all my operating conditions defined exactly as I need them.
LP-500 Big easy to read display
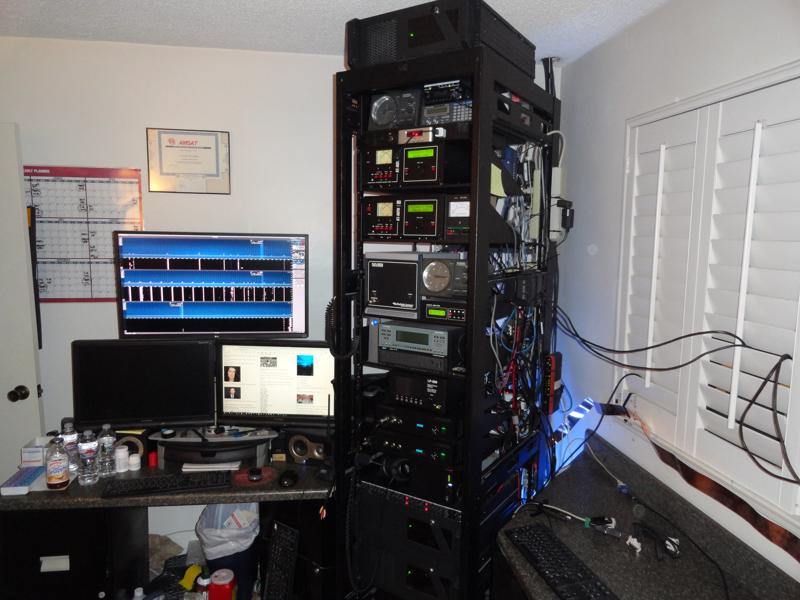
Every inch of rack space utilized
Carefully planned and executed. It all works! Now I can re-arrange the furniture!
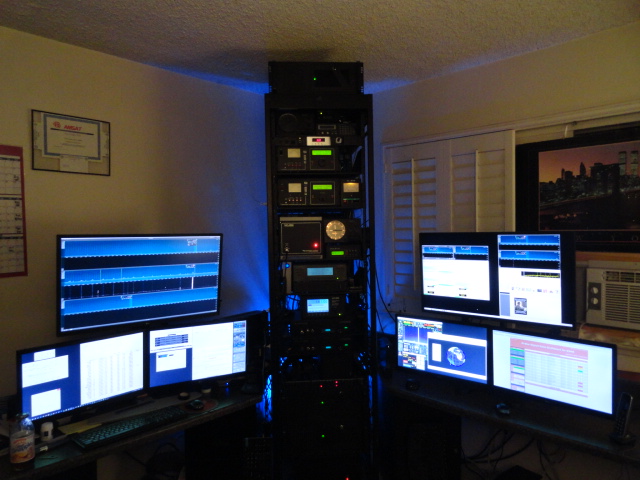
Improving my view!
The rack is complete and back into its corner. One of my aging 22″ monitors has gone dark (above). Rather than repair it again (I installed a capacitor kit the last time it went out) I have decided to replace it and add two more 22’s to balance out the right side display. I chose LG 22M38D-B 22″ 16:9 LCD Monitors. They arrive next week.
Each side display will consist of one 32″ 4K and two 22″ LCD panels. This will provide simultaneous heads up display for 6700 SmartSDR, DXLab, GeoChron 4K, Pi-Star D-STAR Dashboard, JNOS BBS console, 6500 SmartSDR, MMSSTV and EasyPal Live SSTV Cam, SatPC32/FlexSatPC, and WSJT-X v2.
Let the record show that my original webserver, running through the amprnet, has been officially shutdown. The legacy Apache server shutdown on Monday December 31, 2018 23:59 Local Time.
Apache Server Shutdown
The new Intel i5 based server for k6hr.com has been running problem free “in parallel” since December 7. The Ubuntu 16.04 installation appears stable. Onward to 2019!
The LG displays arrived last week. I was finally able to set some time aside to complete the LG multi monitor setup. The only hitch was the Ergotron Arm. I ordered the same model has my existing Ergotron Arm only to find out they replaced the metal pivot point with a plastic one, and, the maximum height adjustment is about two inches lower. So my monitor setup may not be perfectly symmetrical. Grrrrr. I’ll probably insert a spacer between the base of the Ergotron and the desktop to give me the extra height.
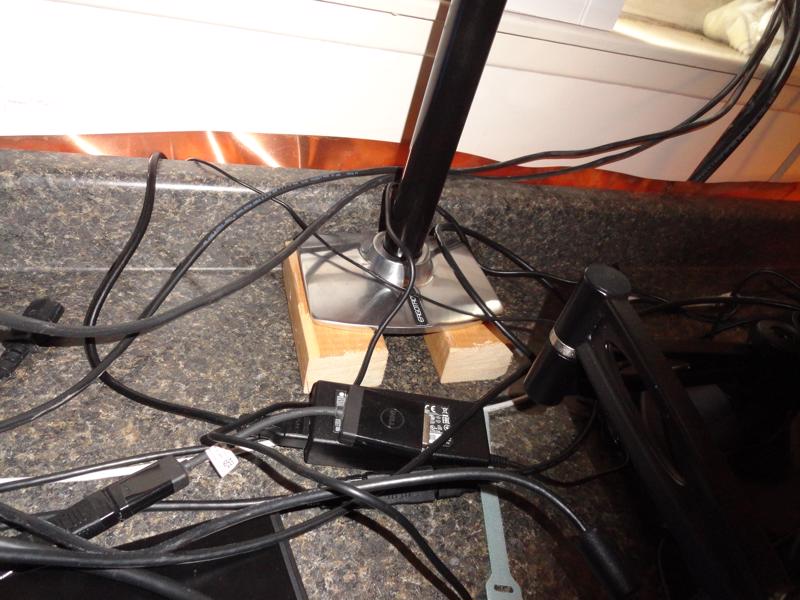
Spacer Solution
Ugly, but out of sight “behind the scenes”. Adds 1.5 inches to display height.
I put two 1.5″ wood blocks under the Ergotron base in order to regain the difference in height. It’s not pretty, but it is out of sight behind the panels so I’m not too bothered. Now that I can match the panel heights on both sides of the rack, the arrangement is finalized.
After some clean up I’ll take the “Official Portrait” for the main page.
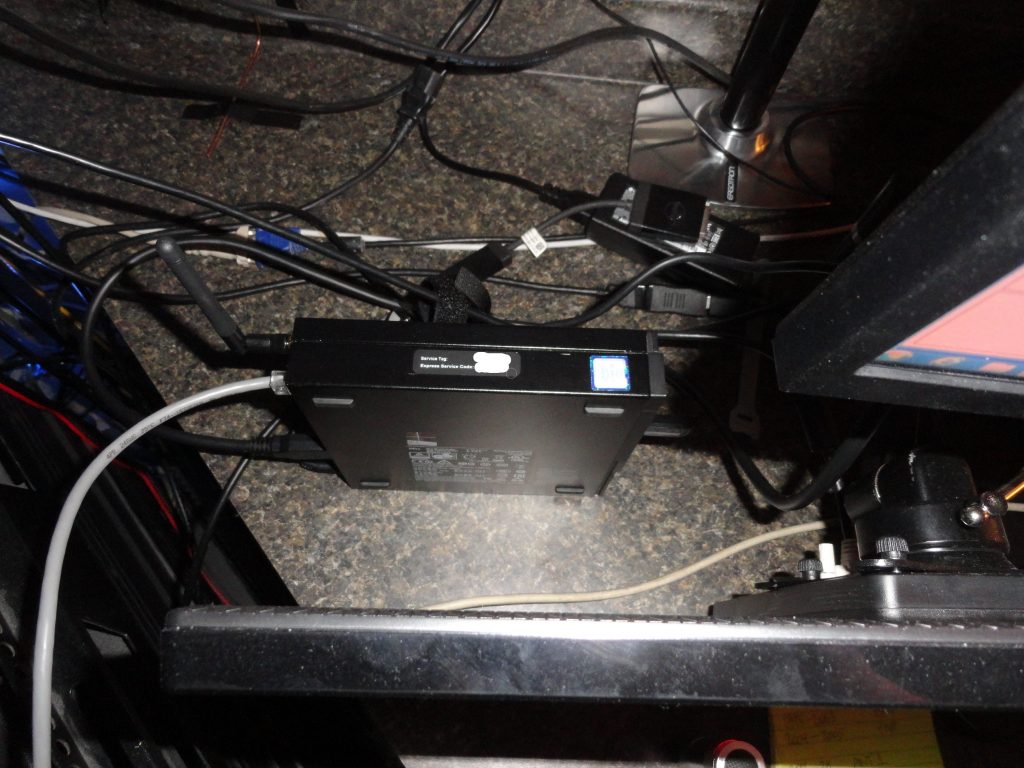
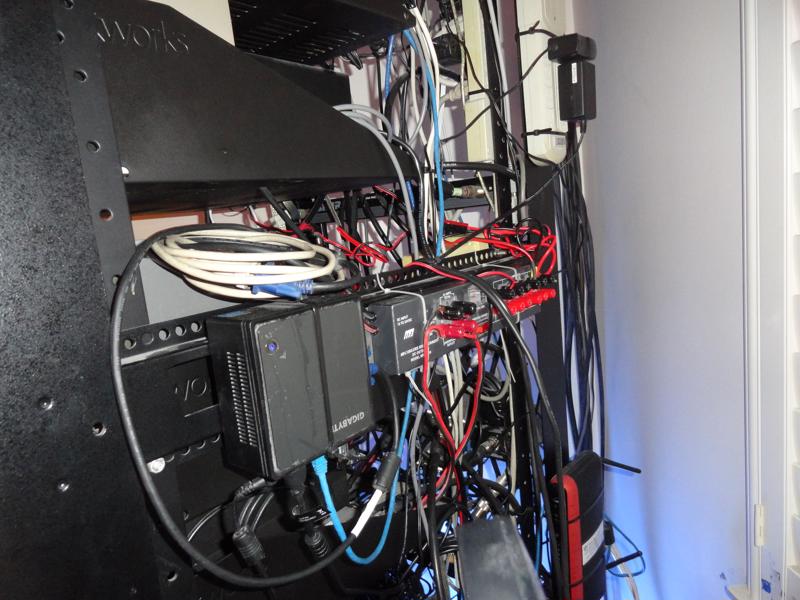
Well folks, the cute little Gigabyte Brix PC failed to make the cut. The Brix was unable to handle the job. I decided to replace it with a more powerful Micro PC. Today I installed a Dell OptiPlex 7050 i5-6500T Micro Form Factor PC 8MB RAM 128GB SSD with four 2.5ghz CPU cores.
A major improvement over the Brix
i5 6500T Quad Core @ 2.5ghz
It fits nicely behind the monitor
The Dell OptiPlex 7050 is fully configured to support the Flex 6500, MMSSTV, KE5RS FTP Widget, EasyPal, and two instances WSJT-X. This will provide 24/7 monitoring of SSTV/EasyPal, and FT8 on any two bands simultaneously.
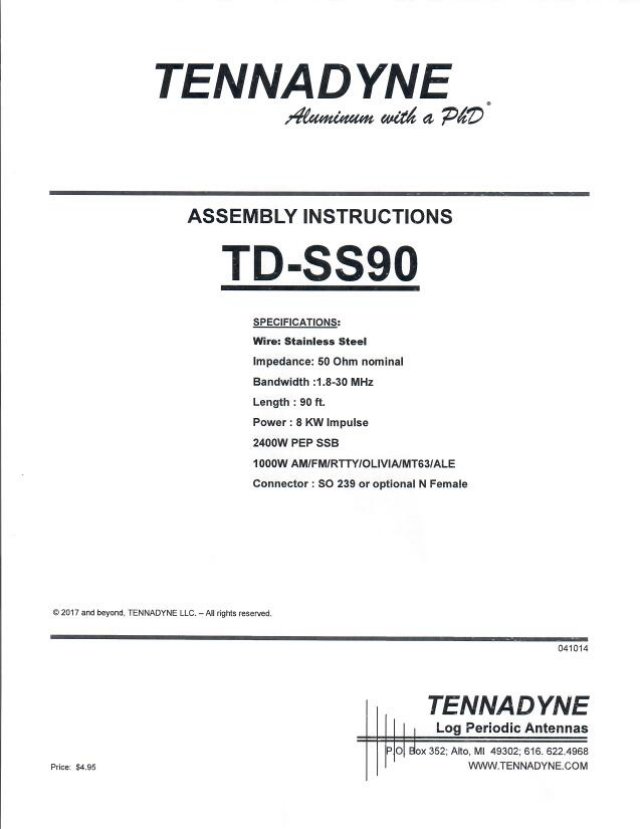
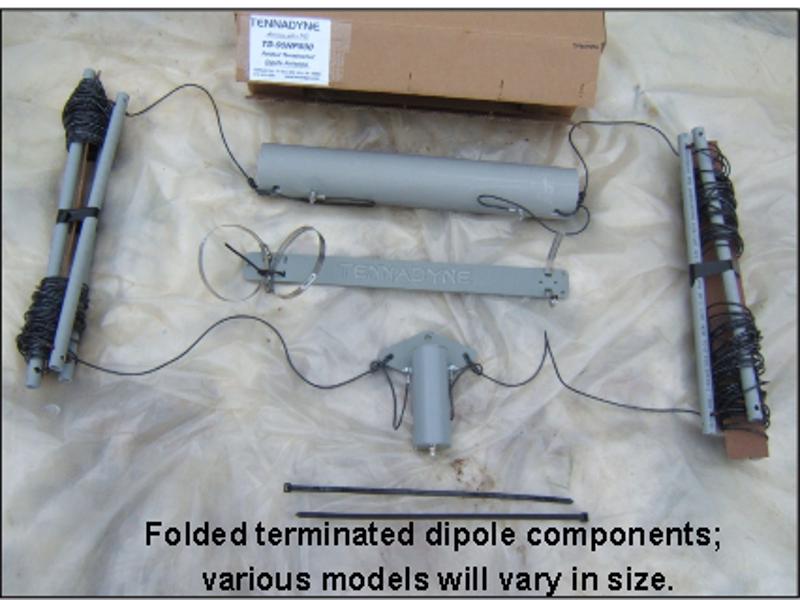
Since installing the Flex 6700 and 6500 transceivers I’ve come to appreciate the amazing low noise RX these two radios provide. Further, I’ve been listening on an RX Only Magnetic Loop antenna vs. my ‘height compromised 130 ft Dipole’ antenna, and needless to say, the noise difference between them is incredible. (as can be seen and heard here) Now if only I could find a wideband, high power, TX antenna that was quiet on RX. Possibility: Tennadyne TD-SS90
Tennadyne TD-SS90 may be my QRO wideband TX solution
High power handling, low noise, 1.8 to 30 mhz coverage, and perhaps most importantly, only 90 feet long!
Tennadyne TD-SS90 easy to install
My ‘130 ft height compromised dipole’ never fit my property. It is way too long. I have one side of it draped over the roof, and only 20 ft high at the apex. It’s too low and too long, performs relatively poorly, and is a very noisy RX antenna. Sure, I made plenty of DX contacts using it, but I have to wonder what it’s been missing buried in the noise.
There were 5 online reviews of the older model TD-90, and 4 of them praised its low noise RX, which immediately caught my attention.
Max Gain Systems: 38 ft Push-Up Mast
I bought one of these push-up masts and had it up for 12 years in the Southern California sun with no problems whatsoever. I eventually took it down to make a crossboom for my LEO Pack, and for some other projects. I plan to purchase another one for this installation if all the measurements work out.
Will It Fit?
Of course before I buy anything I need to get outside and take some measurements. I ran a few ‘triangle’ calculations and it looks like a possible fit. The ends will be East and West (broadside North and South) as I have no other options. This is the same general direction as the existing dipole.
A bit more research is required, but I’m leaning heavily in this direction tonight!
I was trying the FT8 digital mode for the first time on my new Flex 6500. The radio was in (full duty cycle) FT8 transmit at 100 watts into near perfect SWR when I heard a ‘pop’, after which, the radio would no longer power up.
I immediately assumed I had blown up the radio…
Yep, you could say I was a little ‘bent out of shape’. All I can say is, it’s a really terrible feeling. Mostly, I was angry at myself for having blown up the radio. Mega p1553d was more like it…
After regaining some composure, I noticed some of the other 12V gear, not in use at the time, was also off. So I pulled out the voltmeter, and sure enough (and much to my delight!) there was no DC on the power lead to the dead radio!
How Do You Spell Relief?
I immediately connected the radio directly to the power supply and started dancing when the radio powered up. RELIEF is not a strong enough word in this case.
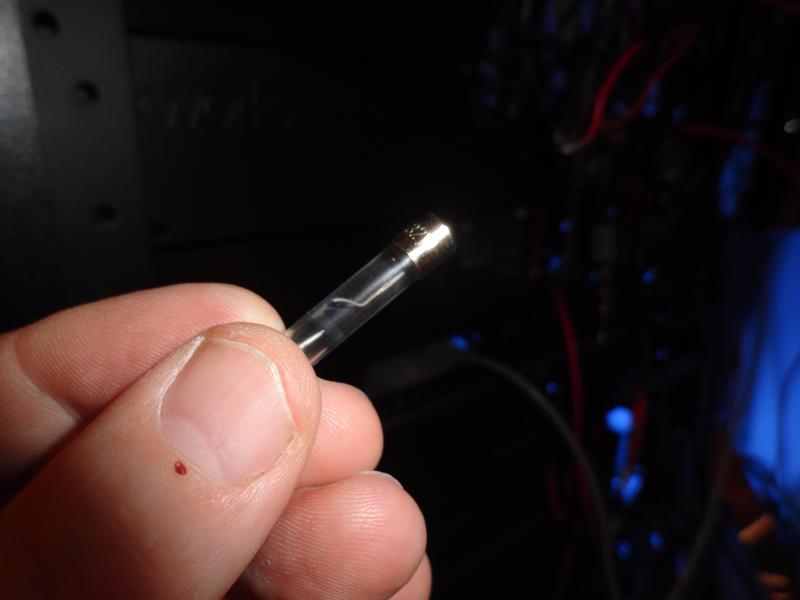
As it turned out, I had blown a fuse in the MFJ power strip!
The culprit: 15A 32V fuse
Can’t blame MFJ for this one! This is what happens when you try to draw 25A through a 15A circuit. A rookie mistake.
Easy to replace….If I can find one!
A couple of local stores are showing them in stock. This is a 15A/32v fuse.
In an effort to take some of the load off the MFJ-1118 I will connect the two 6000 series radios directly to the power supply. The MFJ-1118 is not relied upon to protect the radios, and I now realize that having it inline with the radios is wholly unnecessary.
The most time consuming part of this problem was getting the power strip out of the rack! I had installed the MFJ power strip inside the rack behind the Flex 5000 and now realize it was a design flaw to have located it there.
After replacing the fuse, the MFJ-1118 will be mounted to the exterior side of the rack for easier access going forward.
OK, so by now, I’m sure you’ve figured out how I got myself into this situation!
In error, I had connected the Flex 6500 to a 15 amp circuit. While in full duty cycle transmit the radio requires 25 amps. Hence the pop!
I’ll replace the fuse, change my shorts, Hi Hi, and go on my way a little wiser.
UPDATE: Found the fuse at Home Depot, replaced the fuse and tie wrapped the MFJ-1118 to the side of the rack. Reconnected all the 12v gear, and everything is back together.
I started in Slow Scan TV (or SSTV) in 1995. I began by using a shortwave radio and a Commodore 64 computer to decode the images.
My first ever SSTV RX image! de W5NOO July 24, 1995
As can be seen elsewhere on this site, I’ve been very active in SSTV for many years. I operate a Live 24/7 SSTV Cam that copies images on 14.230 during the day, and on 7.171 in the evenings. I also have a cam on 14.233 for EasyPal digital image reception. My Worldwide SSTV Cams can be viewed here.
Over the years I have gradually upgraded my abilities to include Amateur Satellite operations.
SSTV on the International Space Station
You heard that right! The International Space Station has Slow Scan equipment on board. Not only that! They transmit pictures on 145.8 mhz in the Amateur Radio 2 Meter Band. Slow Scan TV operations aboard the ISS are special occasions. Both the Russian and US astronauts participate.
NASA On The Air!
Received: February 10, 2019 @ 02:54 UTC
50th Anniversary of Apollo 8NASA – Iconic Image of Earth Rise
Special thanks to Brad, KO6KL and AMSAT’s Clint Bradford (K6LCS) for sending me a heads up about this event. I set my satellite station to track the ISS exclusively, in an attempt to capture any images that could be heard. There were several good passes, and the images shown above are the best of the lot this time around. I have the San Bernardino mountains to my north. Once the satellite, or the ISS in this case, gets behind the mountains, the pass is over as there is no longer any reception.
The best source for Slow Scan TV information is the WA9TT SSTV Website run by Larry, in Appleton, Wisconsin.
I read somewhere that at least one of the newly lauched satellites will support SSTV once it’s educational mission has been fulfilled, and the satellite can be released for amateur use. Something to look forward to!
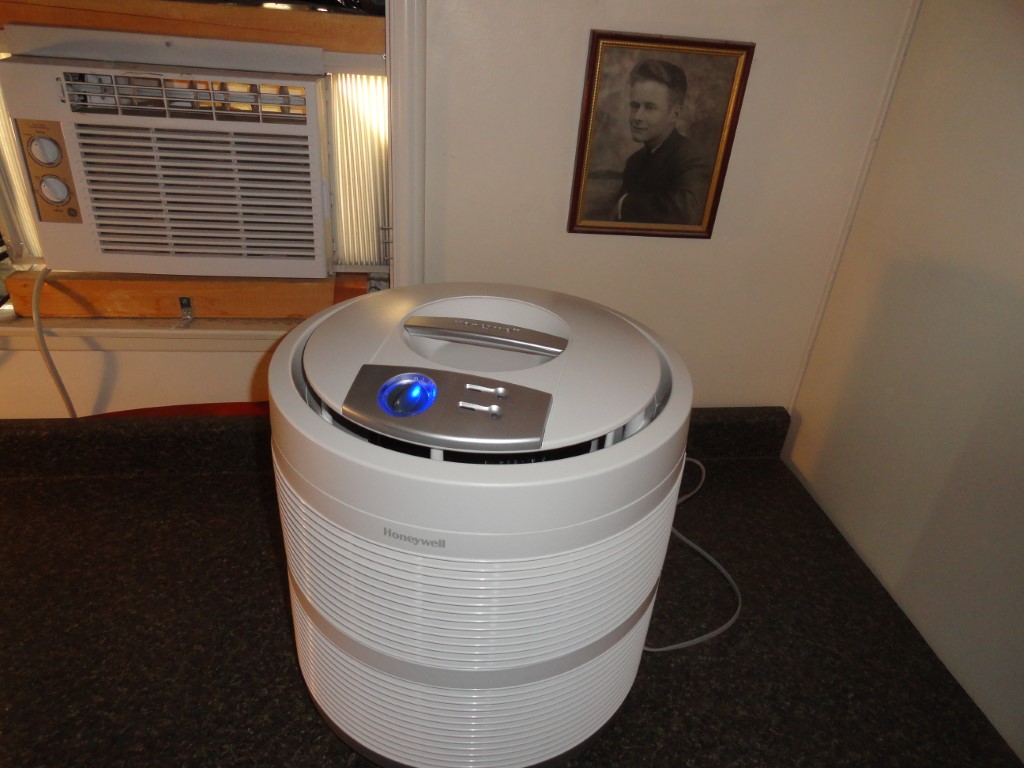
The hepa filter light came on to indicate it was time to clean/replace the filter. I took it outside to clean the outer carbon ‘pre-filter’ and was very happy to see this hepa filter is doing it’s job!
Heavy Duty HEPA Filter
Highly recommended! I had a really bad dust problem in the shack. So bad in fact, that I had to purchase a high power filter to at least try to combat the dust. I needed a heavy duty filter for a heavy duty dust problem. I purchased a filter rated for a much bigger area than that of the shack, to ensure I would obtain the best result.
The indicator light came on, and the pre-filter had a tremendous amount of dust collected. I must say I am really impressed. To think that all that dust would have been in the shack! Just looking around, the shack is MUCH cleaner!
I intend to keep one of these filters running 24/7 in the shack.
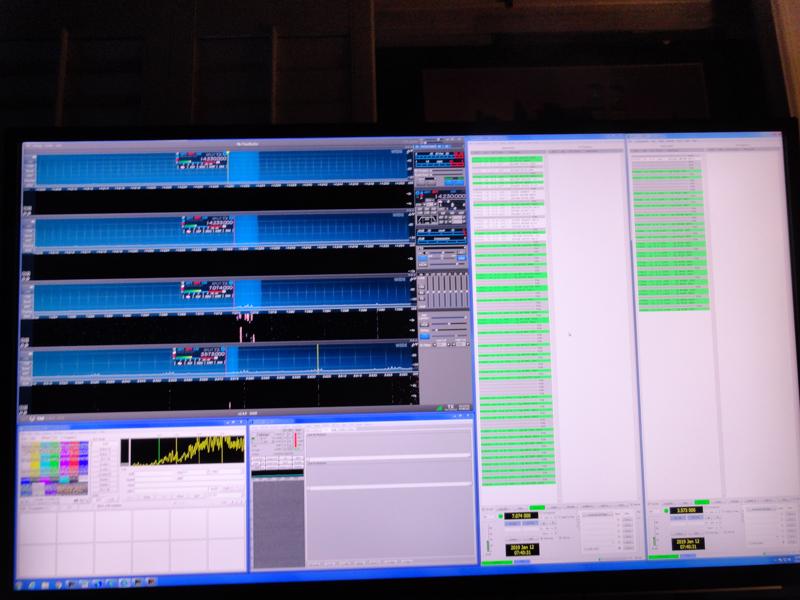
WSJT-X has arrived! I purchased the Flex 6500 for exclusive use in digital modes. I have the 6500 configured to listen for SSTV (Slow Scan Television) signals and EasyPal digital transmissions on the 20 meter band. At the same time I’m running two instances of wsjt-x on other bands.
Making Contacts via FT8
After following the set up instructions, and getting the audio and RF levels correctly set, I was making contacts via FT8 ‘right out of the box’. I’m running the Flex 6500 barefoot (100 watts) into a Comet CHA-250B multiband vertical antenna on a test stand in my backyard. The results were immediate. One of the first few contacts I made via FT8 was DX with JA0IXW. Not bad!
I have been able to complete almost every contact I’ve attempted so I’m pretty confident my little digital setup is working AOK! I’m putting out a very clean 100 watt signal.
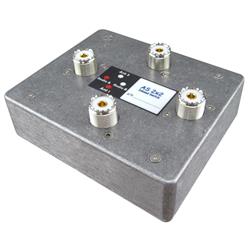
For all intents and purposes, my SO2R operation is self-contained. I use a Flex 6700 dedicated to SO2R operation. I’m operating through an SPE Expert 1K-FA amplifier. This allows using two TX antennas and a wideband RX Magnetic Loop antenna. I enjoy fully automatic operation utilizing one Flex SCU (Spectral Capture Unit) per TX antenna. Really a perfect setup! This configuration has now been thoroughly tested and fine tuned to my operating preferences. Battle tested in contest with more multi band contacts than was ever possible for me while working manually. (the M word). In comes the EA4TX AS2x2 switch to enhance station operation.
I can now freely operate on any band at any frequency, and always have the lowest SWR and the appropriate drive level set automatically. We all know nobody has time to wait around for you to tune up during a contest! You’ve got to be there or be square!
Flex 6500: Dedicated To Digital
Now that I have the SO2R contest station squared away, I’ve turned my attention to the Flex 6500. I have MMSSTV running on 14230, EasyPal on 14233, and two instances of WSJT-X running on any two of any of the other bands that may be open, 24/7. I can work digital modes back and forth between any two bands with a click of the mouse.
For that matter I can also TX from any of the running programs with a single click thanks to the Flex DAX TX feature that switches the TX slice automatically. Combine that with a multiband antenna, and the possibilities are endless!
Watch That Front End!
So now that the digital station is setup and running what’s the problem? Well it’s not a problem yet, but very well could be.
The Flex radios have some built-in protection for the front end of the radio, but it would not be wise to count solely on that feature for complete RX front end protection. In the SO2R setup I added an Array Solutions RXFEP on the RX only antenna to protect the RX when the amplifier is not in operation to switch the RX only antenna automatically. When the amp is off, I have an extra level of protection.
With the 6500 running 24/7 digital modes it would not be hard for me to imagine accidentally TX ‘ing at 1,000+ watts while forgetting the other radio is nearby in RX mode (aka an ‘Inband Radio’). It would just be a matter of time before this type of accident would take place. I could easily make this mistake, so I must add a level of protection against it. In a multi-transmitter environment this is a requirement.
EA4TX AS2X2 Antenna Switch
EA4TX 2X2 Antenna Switch
I researched several antenna switches for the purpose of disconnecting the Flex 6500 antenna when the SO2R contest station is transmitting. Keep in mind I need to be able to transmit 100 watts through the switch. I quickly learned that the the first two “RX Antenna Switches” were not intended for use where the second radio is also a transmitter. Instead they were designed to switch out a receiver only. You cannot transmit back through the second RX port. So the first two switches were eliminated.
I came across the EA4TX AS2X2 and found it could handle 200 watts. It is not an RX only switch, it is a two port switch designed for switching (or exchanging) two antennas (TX and/or RX) between two radios. I’ll only need one side of this switch as I only need to disconnect the Comet CHA-250B antenna, not necessarily switch it with another.
I purchased the EA4TX ARS-USB rotor controller and have been very happy with its quality and performance, so another EA4TX product is welcome. Yes, I saw the single star review. I’m not worried because I know DX Engineering stands behind what they sell, as pointed out in the review.
UPDATE: The AS2x2 arrived today and is now installed at the antenna input of the Flex 6500. Whenever the Flex 6700 is in TX, the antenna to the 6500 is disconnected. Better to be safe than sorry.
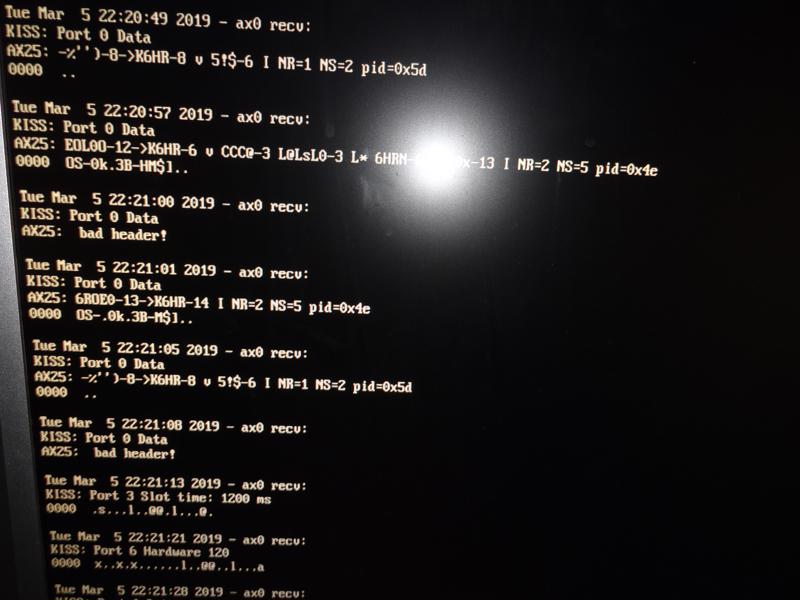
JNOS has been online and on the air here for nearly 20 years. It runs on old Pentium D hardware under Ubuntu Linux 13.04. Old stuff, but it works. at least it did until recently.
The first sign something was wrong, was an error message I hadn’t seen in many many years: bad header!
At first I thought the TNC (an old Kantronics KPC-3) might have fallen out of KISS mode. In order for JNOS to communicate with the TNC it must be in KISS mode. I pulled the TNC out of service and performed a hardware reset to ensure the device was in KISS mode.
Resetting the TNC did not resolve the issue. As the corruption continued, it was causing the JNOS BBS software to crash.
I quickly discovered that disabling the serial device stopped the software from crashing. The next possibility was that the hardware serial port itself had gone bad. After plugging in a USB to Serial adapter and connecting the TNC on a different COM port the problem was solved.
My mighty little JNOS BBS system is back online and back on the air (on 145.05) While I was at it I upgraded the Ubuntu PC RAM from 1GB to 4GB. There was an occasional console message reporting low memory or ‘out of space’ (JNOS parlance). That message has not occurred since.
Your Long Time Friends From Woodhaven NY would like to say Hello
Tim Galvin NY
Tim Galvin
Hey Tim! Check out this picture taken back in 2012 the day you ran into Zomb outside Madison Square Garden. You were both there buying Van Halen tickets. Tim Galvin NY
What have you been up to?
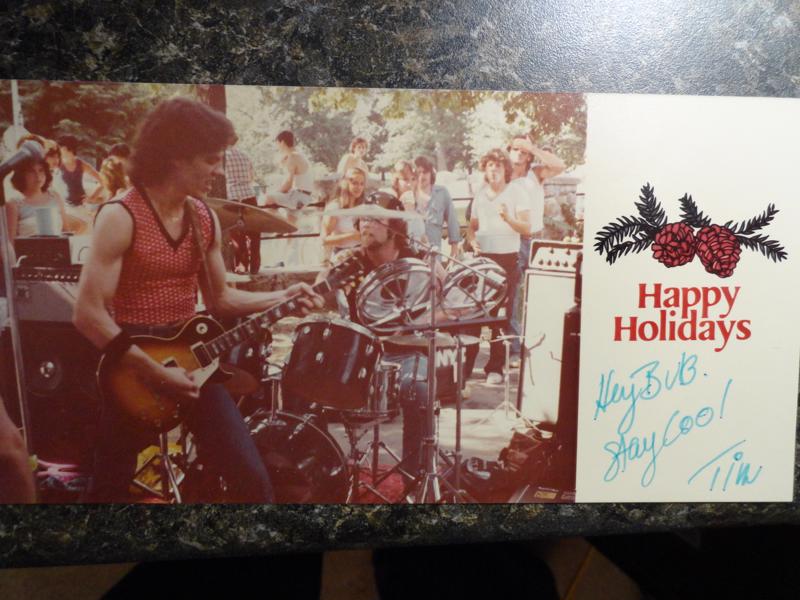
You may remember the last time we met. It was in the Food Court in the Queens Blvd Mall around 1982. You gave me this Christmas card.
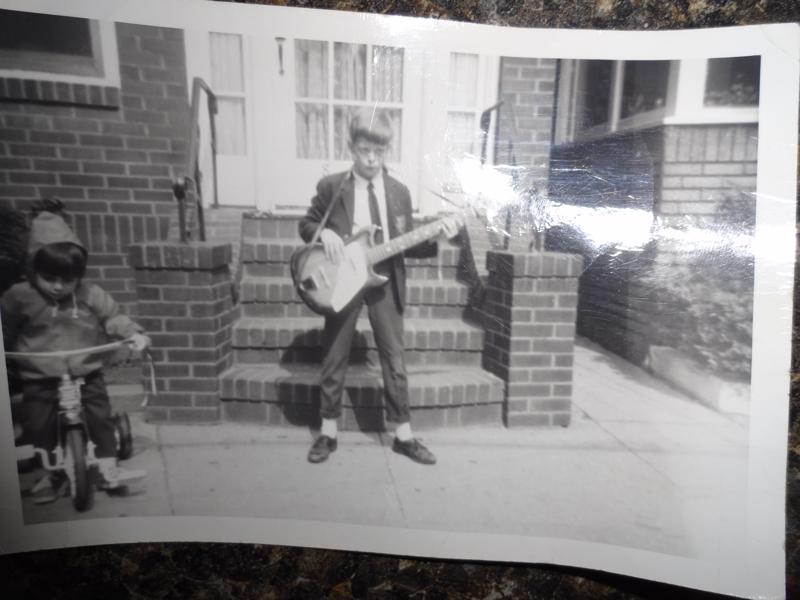
You recommended I try the bass “it only has 4 strings” you said.
I have old recordings you might get a kick out of hearing. I think I have the “Space Ball Riccochet” from your basement, and I know I have the “You think you’re Mr. Drinker” bit from Morello’s basement. I also have a few photos we took one day.
Use this link to email me if you stumble across this and would like to say hello. It would be awesome to hear from you after all these years.
About Forest Park
Forest Park is a park in the New York Cityborough of Queens. It spans 538 acres (218 ha), with 165 acres of trees, including the largest continuous oak forest in Queens.[1] Some trees are more than a century and a half old.[1]
The park sits on hills left behind by the Wisconsin glacier and is a
haven for native plants and wildlife in the midst of the city’s sprawl.[1] Beyond the park’s many full-time avian residents, migratory birds pass through in the spring and fall.[1] Several trails are available for area residents and urban day hikers.[2]
Other facilities include playgrounds, a carousel, a track, two dog
runs, a pond, tennis courts, basketball courts, baseball fields, a golf
course, and more.[3] The park is operated and maintained by the New York City Department of Parks and Recreation.[4]